
Over the past few weeks we have been seeing a flood of vulnerabilities exposed left and right with the help of artificial intelligence. I already talked about this in my article on why we don’t write definitive formal proofs to get bug-free code, when entire projects started falling under automated audits.
I think this is a great thing. The vast majority of those flaws came from risks that have been known for decades, sitting in production only because developers assumed nobody would bother poking around that corner of the codebase.
With AI agents, exploiting easy bugs became dirt cheap. That old “security by obscurity” that seemed to protect smaller systems evaporated overnight.
You must care about cybersecurity from the very first commit. The only way to build that muscle is to adopt a security first posture all the time, adding proper security even to your hello world.
A real case: my personal financial consolidator
To show how this works in practice, I will use as an example a desktop banking and investment tracking app I built for myself. I keep its source code on my private Gitea server here at home and I will never open-source it, for obvious reasons.
Still, I can share a few of the security measures I designed for it. Treat this walkthrough as one way to solve the problem (among many possible approaches), meant to give you inspiration and a starting point to study further.
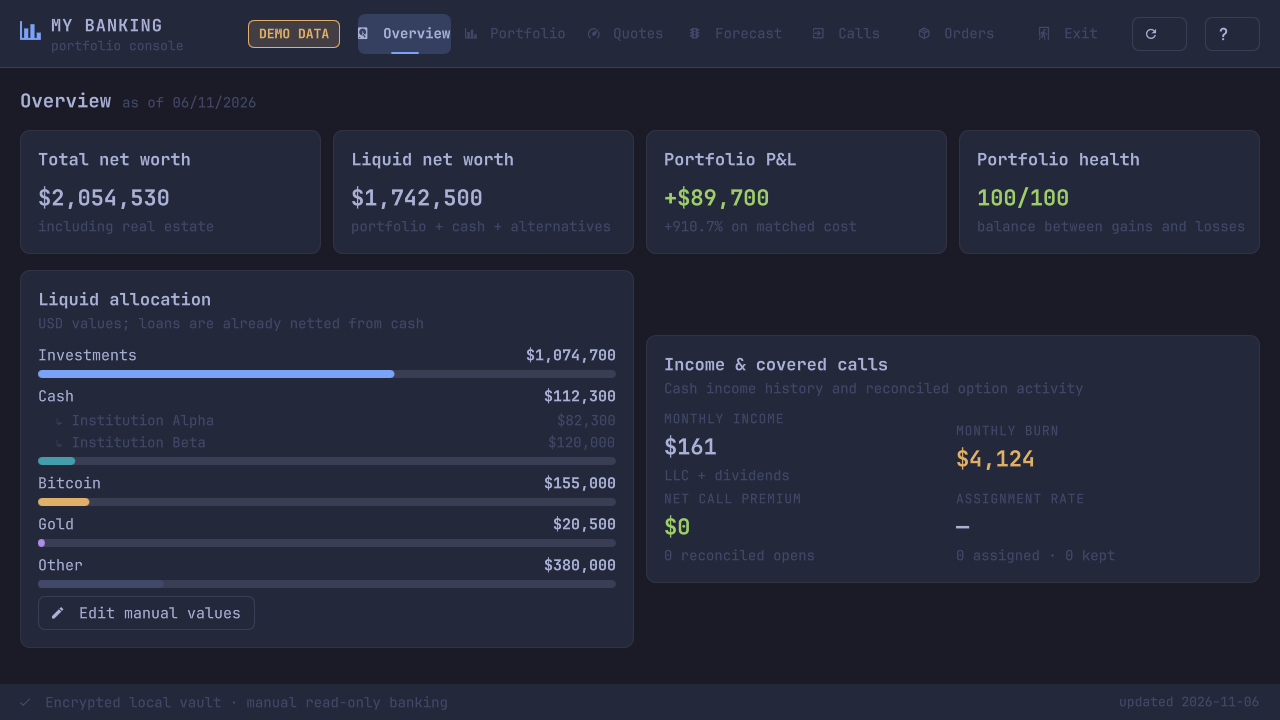
The app is a local GUI written in Rust with a QtQuick/QML interface (via Quickshell) and a local SQLite database. It consolidates account balances, stock portfolios, fixed-income bond maturities, covered-call calculations, and cash runway forecasts into a single UI. Note that all numbers, balances, bank names (Institution Alpha, Institution Beta), and tickers shown in the screenshots above and below are 100% fake data, generated by the app’s built-in --demo mode.
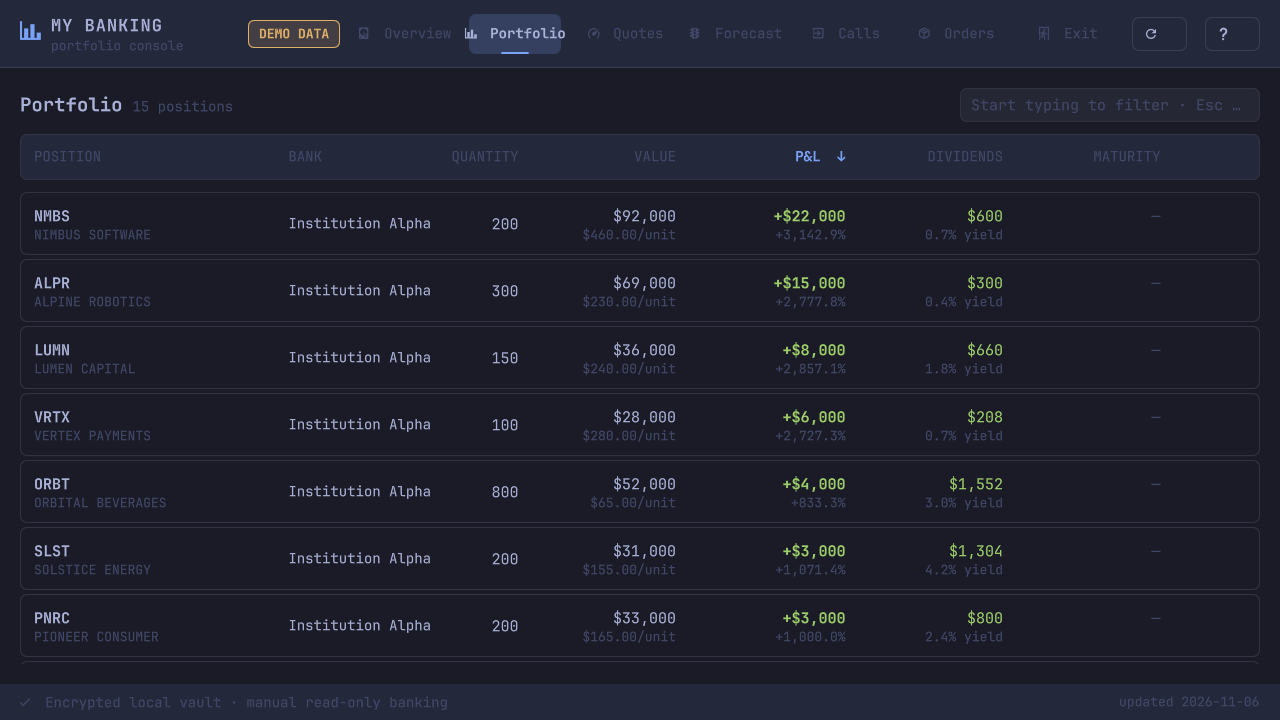
Why does the app automate a web browser instead of hitting a clean REST API? Because most retail and private web banking portals are terribly cumbersome to use and offer zero API access to individual customers.
Doing this by hand would require logging into each bank, querying statements by date range, downloading Excel spreadsheets or trade-note PDFs, and manually copying and pasting numbers elsewhere. In my current workflow, the app opens a controlled browser window, I manually log in and complete 2FA on the bank’s real page, click a “Take over” button, and the automation takes over strictly to fetch statements, feed my database, and close the session.
The original sin of the experimental version
In the first experimental version (the one you throw together in a rush of vibecoding just to see the charts working on screen), I cut every corner imaginable:
- The SQLite database sat in plaintext on disk with
0644permissions, readable by any process running under my user account. - The instrumented browser saved cookies and sessions in a persistent profile on disk to speed up subsequent runs.
- Bank credentials lived in the desktop session keyring (
secret-tool), allowing a backgroundsystemdtimer to run unattended. - Chromium launched with
--no-sandboxand exposed Chrome DevTools Protocol (CDP) port9333onlocalhostwith--remote-allow-origins=*. - Verification codes (OTPs) were scraped automatically from my locally synced
mbsyncmaildir.
I am usually very paranoid about security, and even I grew anxious knowing that all of this data was sitting in plaintext on my SSD. Even on my private PC, locked in my office where nobody else has physical access, any malicious npm package, rogue browser extension, Python script, or compromised binary running under my UID would have full access to my financial life.
If a single compromised process running under your user account can
catyour database or attach to the debug port of a browser logged into your bank, you have a severe architectural flaw.
I decided to stop everything and rewrite the project’s security foundation as if it were a critical production system. Let’s walk through each layer step by step, at a level that any junior developer can follow and apply to their own projects.
Step 1: encrypting SQLite with SQLCipher and verified migration
The obvious first step was getting the SQLite database out of plaintext. In the SQLite ecosystem, the gold standard for transparent page-level encryption is SQLCipher (available in Rust through the bundled-sqlcipher-vendored-openssl feature of the rusqlite crate).
Instead of encrypting individual columns piecemeal, SQLCipher encrypts the entire database file page by page (using AES-256-CBC with HMAC-SHA512 authentication). Table names, indexes, and even the standard file header (SQLite format 3\0) are completely indistinguishable from random noise on disk.
To guarantee that no connection ever opens the database with weak defaults by accident, every connection goes through an initializer that rejects plaintext headers and enforces the cryptographic profile before running any query:
const RAW_SQLITE_MAGIC: &[u8; 16] = b"SQLite format 3\0";
const CIPHER_PAGE_SIZE: u32 = 4096;
const CIPHER_KDF_ITER: u32 = 256_000;

fn apply_cipher_pragmas(conn: &Connection, key: &DatabaseKey) -> Result<()> {
    let key_pragma = format!("PRAGMA key = \"{}\";", key.sqlcipher_raw_key_literal());
    conn.execute_batch(&key_pragma)
        .map_err(|_| VaultError::InvalidKeyOrCorruptDatabase)?;

    conn.execute_batch(&format!(
        "
        PRAGMA cipher_compatibility = 4;
        PRAGMA cipher_page_size = {CIPHER_PAGE_SIZE};
        PRAGMA kdf_iter = {CIPHER_KDF_ITER};
        PRAGMA cipher_kdf_algorithm = PBKDF2_HMAC_SHA512;
        PRAGMA cipher_hmac_algorithm = HMAC_SHA512;
        PRAGMA cipher_plaintext_header_size = 0;
        PRAGMA cipher_memory_security = ON;
        PRAGMA foreign_keys = ON;
        PRAGMA secure_delete = ON;
        PRAGMA temp_store = MEMORY;
        PRAGMA trusted_schema = OFF;
        "
    ))?;

    let _: i64 = conn
        .query_row("SELECT count(*) FROM sqlite_schema;", [], |row| row.get(0))
        .map_err(|_| VaultError::InvalidKeyOrCorruptDatabase)?;

    Ok(())
}
If you are learning how this works, here is what each PRAGMA above does:
kdf_iter = 256000andPBKDF2_HMAC_SHA512run key derivation through over 250,000 rounds of SHA-512 hashing, making brute-force attempts prohibitively slow.cipher_plaintext_header_size = 0encrypts the very first bytes of the file as well (where the 16-byte salt lives), so external tools likefileorhexdumpsee only random noise.temp_store = MEMORYandcipher_memory_security = ONprevent temporary sorting tables from spilling to/tmpin plaintext and zero out SQLite heap allocations before returning them to the OS.trusted_schema = OFFprevents malicious SQL functions or triggers embedded inside a database file from executing unexpected code.
Migrating an existing database without losing data
When you already have months of financial history in a plaintext SQLite file, running a quick-and-dirty migration script is asking for data corruption. I built a gated migration pipeline backed by a deterministic mathematical integrity check (logical fingerprint):
pub fn compute_logical_fingerprint(conn: &Connection) -> Result<String> {
    let mut hasher = Sha256::new();
    update_tagged(&mut hasher, "fingerprint-version", "1");

    let objects = load_schema_objects(conn)?;
    update_tagged(&mut hasher, "schema-object-count", &objects.len().to_string());
    for obj in &objects {
        update_tagged(&mut hasher, "schema-object-kind", &obj.kind);
        update_tagged(&mut hasher, "schema-object-name", &obj.name);
        update_tagged(&mut hasher, "schema-object-sql", &obj.sql);
    }

    for table in objects.iter().filter(|o| o.kind == "table") {
        hash_table_rows(conn, &table.name, &mut hasher)?;
    }

    Ok(hex_encode(&hasher.finalize()))
}
The full migration follows a strict checklist:
- Quiesce any legacy timers and run
PRAGMA wal_checkpoint(TRUNCATE)so the WAL journal is folded cleanly into the main file. - Create a
0600backup copy and compute the logical SHA-256 fingerprint across the entire schema and every ordered row of every table. - Use
sqlcipher_exportto copy all records into a new encrypted database, verify that the logical fingerprint remained identical, and import cached trade-note PDFs that previously sat loose on disk into an encrypteddocumentsBLOB table. - Generate a
.mbbackuparchive, restore that archive into an isolated temporary directory, and recompute the post-upgrade logical fingerprint. - Only when every fingerprint matches bit for bit does the system archive the old file and move the encrypted database into the official path via the
renameat2syscall withRENAME_NOREPLACE(which refuses to overwrite any existing backup by accident).
Step 2: where do we store the key? TPM 2.0, Polkit, and privilege drop
Encrypting the database immediately creates the classic dilemma of every cryptographic system: where do you keep the key that unlocks the database?
Putting the key inside a .env or config.json file in your $HOME directory is the digital equivalent of locking a door and taping the key to the doorknob. Deriving the key directly from a typed password makes human-chosen passwords the weakest link; worse, if the QML graphical frontend reads that password, the UI process itself gains access to the secret.
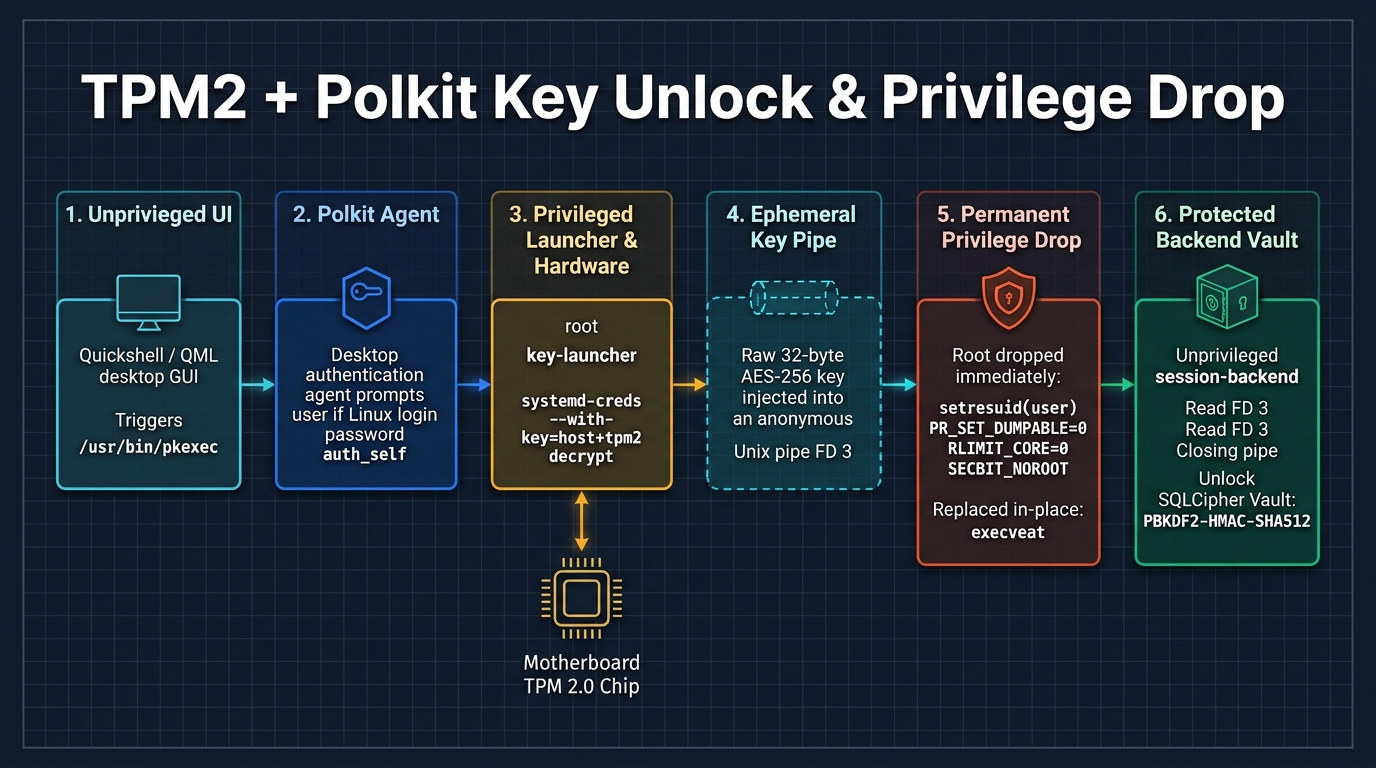
The architecture I implemented combines three native building blocks of modern Linux: TPM 2.0, systemd-creds, and Polkit (pkexec).
What is a TPM?
If you have never worked with one before: a TPM (Trusted Platform Module) is a dedicated cryptographic microcontroller soldered onto the motherboard of almost every modern desktop or laptop (or built directly into the CPU firmware, such as Intel PTT and AMD fTPM).
Unlike a regular file on your SSD, a TPM holds internal hardware keys that never leave the chip. You can hand a chunk of bytes to the TPM (in our case, a random 256-bit key generated by the kernel CSPRNG) and ask the chip to “seal” that secret.
The TPM returns an encrypted credential blob (.cred). If an attacker steals your SSD or copies that .cred file to another computer, the file is useless: only the physical TPM chip on your specific motherboard can unseal that envelope.
On a systemd-based Linux machine, we don’t even need to write low-level C code talking directly to /dev/tpmrm0. The built-in systemd-creds utility handles sealing (encrypt with --with-key=host+tpm2) and unsealing (decrypt with --refuse-null, reading the required key type directly from the .cred header):
pub fn build_systemd_creds_encrypt_command(cred_name: &str) -> (PathBuf, Vec<OsString>) {
    (
        PathBuf::from("/usr/bin/systemd-creds"),
        vec![
            OsString::from("--with-key=host+tpm2"),
            OsString::from("--name"),
            OsString::from(cred_name),
            OsString::from("--newline=no"),
            OsString::from("encrypt"),
            OsString::from("-"),
            OsString::from("-"),
        ],
    )
}

pub fn build_systemd_creds_decrypt_command(
    cred_name: &str,
    credential_path: &Path,
) -> (PathBuf, Vec<OsString>) {
    (
        PathBuf::from("/usr/bin/systemd-creds"),
        vec![
            OsString::from("--name"),
            OsString::from(cred_name),
            OsString::from("--newline=no"),
            OsString::from("--refuse-null"),
            OsString::from("decrypt"),
            credential_path.as_os_str().to_os_string(),
            OsString::from("-"),
        ],
    )
}
How my login password unlocks everything without touching the UI
The TPM-sealed .cred file lives at /var/lib/.../vault.key.cred, owned by root:root with mode 0600. No unprivileged process running under my normal user account can even read that file.
When I open the desktop app and click “Unlock Vault”, a tightly choreographed sequence takes place:
- The GUI invokes
/usr/bin/pkexec /usr/lib/.../key-launcher. - Polkit intercepts the call and opens the native desktop authentication dialog asking for my Linux login password (configured with
<allow_active>auth_self</allow_active>, with zero session caching, requiring authentication on every unlock). - My login password never passes through my app. The OS Polkit/PAM agent validates it directly.
- Once Polkit verifies my password, it launches the
key-launcherbinary asroot. key-launcherverifies that it was invoked by my expected UID (PKEXEC_UID), checks directory ownership and permissions viaO_NOFOLLOWfile descriptors to defeat symlink races, and invokessystemd-credsto ask the TPM to unseal the.credblob.key-launcherreceives the raw 32-byte key in memory (wrapped inZeroizeOnDropso it is wiped the instant it leaves scope), creates an anonymous kernel pipe, writes the 32 bytes into File Descriptor 3 (FD 3), and closes the write end.- Before starting the application backend,
key-launcherpermanently and irreversibly drops all root privileges and replaces its own process image in place viaexecveat.
Here is the actual privilege-drop and memory-hardening sequence in Rust inside key-launcher:
const KEY_FD: RawFd = 3;

fn drop_privileges_permanently(target_uid: u32, target_gid: u32) -> Result<()> {
    unsafe {
        libc::umask(0o077);
    }
    std::env::set_current_dir("/")?;

    drop_supplementary_groups()?;
    clear_capability_bounding_set()?;
    clear_ambient_capabilities()?;
    lock_no_root_securebits()?;

    // Permanently switch real, effective, and saved GID and UID
    let rc_gid = unsafe { libc::setresgid(target_gid, target_gid, target_gid) };
    if rc_gid != 0 {
        return Err(LauncherError::Syscall("setresgid", io::Error::last_os_error()));
    }

    let rc_uid = unsafe { libc::setresuid(target_uid, target_uid, target_uid) };
    if rc_uid != 0 {
        return Err(LauncherError::Syscall("setresuid", io::Error::last_os_error()));
    }

    // Verify that attempting to regain root (setuid(0)) fails unconditionally
    if unsafe { libc::setuid(0) } == 0 {
        return Err(LauncherError::PrivilegeVerification(
            "setuid(0) succeeded after privilege drop",
        ));
    }

    // Block privilege escalation across execve and disable ptrace/core dumps
    unsafe {
        libc::prctl(libc::PR_SET_NO_NEW_PRIVS, 1, 0, 0, 0);
        libc::prctl(libc::PR_SET_DUMPABLE, 0, 0, 0, 0);
    }
    set_zero_core_limit()?;
    Ok(())
}
Notice the details at the bottom of that function:
PR_SET_DUMPABLE = 0andRLIMIT_CORE = 0forbid the kernel from writing core dumps to disk (which would spill the database key onto the filesystem) and block other processes under the same user UID from attachinggdborptraceto inspect the backend’s RAM. Because the Linux kernel resetsdumpableto1whenexecveruns a normal binary,session-backendas well as the browser-session and parser helper binaries re-applyPR_SET_DUMPABLE = 0on the very first line ofmain(whileRLIMIT_CORE = 0andPR_SET_NO_NEW_PRIVSremain inherited from the launcher).- Passing secrets via
--key=...or environment variables exposes them in/proc/<pid>/cmdlineand/proc/<pid>/environ. Passing the 32 bytes through an anonymous pipe onFD 3that is read once and closed immediately at startup ensures the secret never touches/proc. - The QML graphical shell talks to
session-backendstrictly over newline-delimited JSON (NDJSON capped at 64 KiB per line). The UI never receives the encryption key and never touches the SQLite file directly.
Hardening the key in RAM (mlock, MADV_DONTDUMP) and inactivity auto-lock
Even after session-backend reads the 32 bytes from FD 3 and closes the descriptor, the key has to live in RAM while the vault is unlocked. That brings up two classic risks people often overlook: what if the Linux kernel pages that memory region out to an unencrypted swap partition on the SSD (or a hibernation image)? And what if I unlock the app in the morning, minimize the window, and leave the vault sitting open for the rest of the day?
To close the first gap, DatabaseKey stores the 32 bytes inside a heap-allocated Box<[u8; 32]> and pins that physical memory page in RAM with mlock:
pub struct DatabaseKey(Box<[u8; KEY_BYTES]>);

impl DatabaseKey {
    pub fn from_bytes(mut bytes: [u8; KEY_BYTES]) -> Self {
        let mut boxed = Box::new(bytes);
        bytes.zeroize();
        lock_key_page(&mut boxed[..]);
        Self(boxed)
    }
}

impl Drop for DatabaseKey {
    fn drop(&mut self) {
        let ptr = self.0[..].as_mut_ptr().cast::<core::ffi::c_void>();
        self.0.zeroize();
        let _ = unsafe { rustix::mm::munlock(ptr, KEY_BYTES) };
    }
}

fn lock_key_page(buffer: &mut [u8]) {
    let ptr = buffer.as_mut_ptr().cast::<core::ffi::c_void>();
    let len = buffer.len();
    unsafe {
        let _ = rustix::mm::mlock(ptr, len);
        #[cfg(target_os = "linux")]
        let _ = rustix::mm::madvise(ptr, len, rustix::mm::Advice::LinuxDontDump);
    }
}
Notice a subtle Rust detail here: why use Box<[u8; 32]> instead of an inline [u8; 32] array inside the struct? Because the mlock(2) syscall locks a specific virtual address range, and moving an inline stack array by value would shift the bytes to a new address, leaving the old address locked for nothing and the new one unlocked.
Putting the array behind a Box keeps its heap address stable from creation until Drop, where we wipe the bytes with zeroize() before calling munlock. On top of that, MADV_DONTDUMP marks that page so it is excluded from any memory dump.
To prevent the vault from staying open forever when left idle on a background workspace, the main loop of session-backend enforces an inactivity timer (IDLE_LOCK_TIMEOUT set to 15 minutes). If 15 minutes pass without a UI request and without an active bank handoff running, the backend closes the SQLCipher connection, drops DatabaseKey (triggering zeroize + munlock), notifies the UI that the session expired (idle_locked), and terminates its own process. Resuming requires going through a fresh Polkit prompt and TPM unseal.
Step 3: putting the browser and PDF parser into a prison (sandbox)
With the database locked down, the most dangerous component of any modern application remained: the web browser.
A web browser is practically an entire operating system executing arbitrary JavaScript fetched from the internet. In my initial prototype, the browser ran unrestricted inside my normal desktop session with full access to my $HOME directory, my primary display server, and the entire internet.
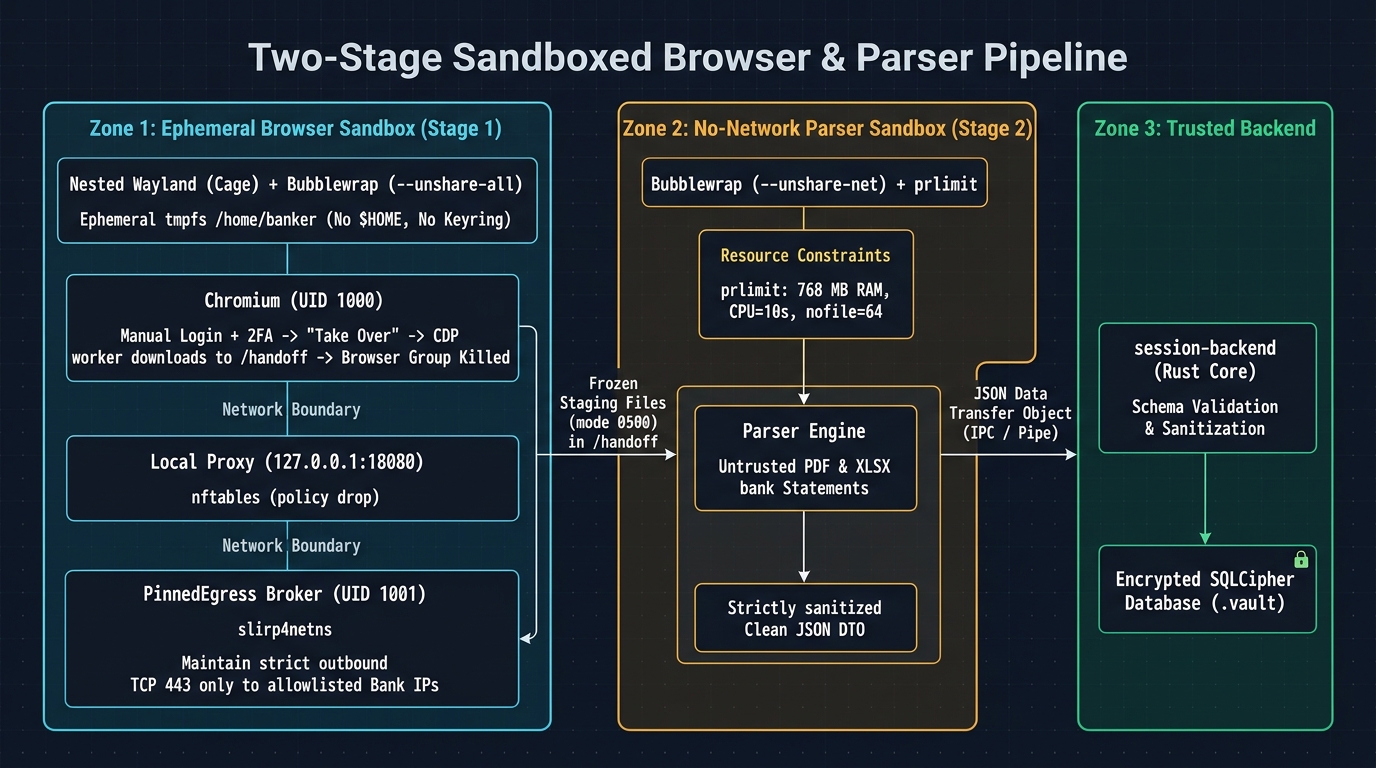
To contain that surface, I designed a two-stage sandbox pipeline: one sandbox for the interactive browser during manual login, and a second networkless sandbox strictly for parsing downloaded files.
Pros and cons of sandboxing the browser
Before looking at the code, it helps to weigh the trade-offs of isolating a browser this aggressively.
On the benefit side:
- The browser only sees a synthetic
/home/bankermounted in RAM (tmpfs), with zero access to personal files, SSH keys (~/.ssh), GPG keys, crypto wallets, or the SQLCipher vault itself. - The moment data collection finishes and the process exits, cookies, session tokens, cache, and
localStoragevanish from RAM. - Instead of opening a window directly on the host compositor, the browser runs inside a dedicated nested Wayland compositor (
cage), preventing cross-window keylogging or silent screen scraping. - Even if a script tries to phone home to an external domain, the in-sandbox firewall drops every packet outside the allowlisted bank IPs.
On the operational cost side:
- Because the browser profile starts fresh on every run and no credentials are stored, I have to type my username and password and approve 2FA on my phone every time I want to sync.
- Because outbound IPs are pinned before launch, if a bank’s CDN rotates IP addresses mid-session, the connection drops and must be restarted.
- Packaging requires
bubblewrap(bwrap),slirp4netns,nftables, andcageinstalled and configured on the host.
How network locking works inside Bubblewrap
Many developers run bubblewrap (bwrap) with slirp4netns --disable-host-loopback assuming that is enough to isolate network traffic. That flag does block the browser from reaching services bound to 127.0.0.1 on the host, but it still lets the browser connect to any public IP address on the internet.
To stop the browser from talking to any server outside the specific bank I am accessing, the sandbox uses two distinct UIDs inside the network namespace: the browser runs as UID 1000 (BROWSER_UID) and a tiny internal Rust proxy (Pinned Egress Broker) runs as UID 1001 (BROKER_UID).
Before Chromium starts, an nftables ruleset with a default drop policy is loaded inside the namespace:
pub fn generate_nftables_ruleset(
    pinned: &PinnedEgress,
    broker_port: u16,
    browser_uid: u32,
    broker_uid: u32,
) -> Result<String> {
    let mut allowed_ips = Vec::new();
    for addrs in pinned.host_addrs.values() {
        for addr in addrs {
            if !is_globally_routable_bank_ip(*addr) {
                return Err(SessionError::PinnedIpNotPublic(*addr));
            }
            if !allowed_ips.contains(addr) {
                allowed_ips.push(*addr);
            }
        }
    }

    let ip_list = allowed_ips
        .iter()
        .map(Ipv4Addr::to_string)
        .collect::<Vec<_>>()
        .join(", ");

    Ok(format!(
        "table inet bank_sandbox {{\n\
         \tchain output {{\n\
         \t\ttype filter hook output priority 0; policy drop;\n\
         \t\tct state established,related accept\n\
         \t\toifname \"lo\" meta skuid {browser_uid} ip daddr 127.0.0.1 tcp dport {broker_port} accept\n\
         \t\toifname \"lo\" meta skuid {broker_uid} ip daddr 127.0.0.1 accept\n\
         \t\tmeta skuid {broker_uid} ip daddr {{ {ip_list} }} tcp dport 443 accept\n\
         \t\tdrop\n\
         \t}}\n\
         }}\n"
    ))
}
Look at what those five nftables rules enforce:
- The browser (
skuid 1000) is forbidden from reaching the internet directly (policy drop). The only packet the kernel allows the browser to send is to127.0.0.1:18080, where our broker listens. - The broker (
skuid 1001) receives theHTTP CONNECT host:443request, verifies thathostbelongs to the strict allowlist for that bank (e.g.,ebanking.bank-alpha.example), and connects exclusively to the public IPv4 addresses resolved before the browser launched. - Private ranges (RFC 1918), loopback, link-local, and cloud metadata endpoints (
169.254.169.254) are rejected outright, defeating DNS rebinding attacks. - Because Chromium runs inside
bwrapwith properly mapped user namespaces, we keep Chromium’s own internal sandbox enabled (no--no-sandbox), and CDP binds to an ephemeral port (--remote-debugging-port=0) reachable only inside the isolated namespace.
One-way, single-use clipboard bridge (--paste-once --sensitive)
Isolating the browser inside its own nested Wayland compositor (cage) with a separate XDG_RUNTIME_DIR immediately raises a practical usability problem: how do I paste a 30-character random password from my desktop password manager into the isolated browser?
Sharing the host Wayland socket just to make Ctrl+V work would defeat display isolation and let an untrusted page read or overwrite the host clipboard at will.
Instead, the supervisor runs a strictly one-way clipboard bridge (from the host into cage) using wl-paste and wl-copy:
fn nested_clipboard_offer_command(wl_copy: &Path, runtime: &Path, nested_display: &str) -> Command {
    let mut command = Command::new(wl_copy);
    command
        .args([
            "--foreground",
            "--paste-once",
            "--trim-newline",
            "--type",
            "text/plain;charset=utf-8",
            "--sensitive",
        ])
        .env_clear()
        .env("PATH", "/usr/bin")
        .env("XDG_RUNTIME_DIR", runtime)
        .env("WAYLAND_DISPLAY", nested_display)
        .stdout(Stdio::null())
        .stderr(Stdio::inherit());
    command
}
Here is how it works: the supervisor outside bwrap watches plain text copied on the host and pipes it into the nested Wayland socket (wayland-bank) with --paste-once and --sensitive.
The sandboxed browser can receive a single Ctrl+V of the password I just copied from my password manager; the instant it is pasted once, wl-copy destroys the clipboard offer inside the sandbox and exits. And because there is no reverse path, the untrusted browser can never write anything back to my host desktop clipboard.
Stage two: parsing PDFs and Excel files with zero network access
Once I finish logging into the bank, click “Take over”, and the worker downloads the statements or trade notes into /handoff, the supervisor immediately kills the entire browser and network process group.
That leaves another classic attack surface: parsing untrusted PDF files and XLSX spreadsheets. Libraries that parse PDFs and legacy spreadsheet formats have a long history of memory-safety bugs and denial-of-service vulnerabilities (we even upgraded the calamine crate during development due to RUSTSEC-2026-0436).
Instead of letting the trusted backend process open those PDFs directly, the supervisor freezes the staging directory to mode 0500 (read-only) and spawns a second bwrap sandbox, this time with --unshare-net (zero network interfaces) and strict resource limits enforced by prlimit:
const PARSER_AS_LIMIT_BYTES: u64 = 768 * 1024 * 1024; // 768 MiB RAM max
const PARSER_CPU_LIMIT_SECONDS: u64 = 10;             // 10s CPU max
const PARSER_NOFILE_LIMIT: u64 = 64;                  // max 64 file descriptors
const PARSER_NPROC_LIMIT: u64 = 16;                   // max 16 threads/processes

pub fn build_sandboxed_parser_command(
    bwrap_program: &Path,
    prlimit_program: &Path,
    parser_binary: &Path,
    staging_dir: &Path,
    output_file: &Path,
    bank: &str,
) -> (PathBuf, Vec<OsString>) {
    // ...
    let args = vec![
        OsString::from("--unshare-all"),
        OsString::from("--unshare-net"),
        OsString::from("--die-with-parent"),
        OsString::from("--new-session"),
        OsString::from("--clearenv"),
        // Mount /usr, /lib, and the staging directory read-only (--ro-bind)
        // ...
    ];
    // Executed under prlimit --as=768M --cpu=10 --nofile=64 --nproc=16 --core=0
}
If a malformed PDF or an XLSX zip-bomb tries to exhaust memory or exploit a parser bug, the process hits the roughly 770 MB RAM ceiling or the 10-second CPU cap, has no network interface to exfiltrate anything, cannot see the database, and gets killed by the kernel. The main backend only touches the result if the parser returns a strictly typed, size-bounded JSON DTO.
Step 4: authenticated backups, recovery key, and NAS
Locking your database key inside the motherboard’s TPM chip raises an obvious question: what happens if my motherboard dies tomorrow?
If the physical TPM chip on that specific board were the only way to unlock the database, a hardware failure would permanently lock you out of your own financial records. Security without a disaster recovery plan is just an elaborate way to lose your data.
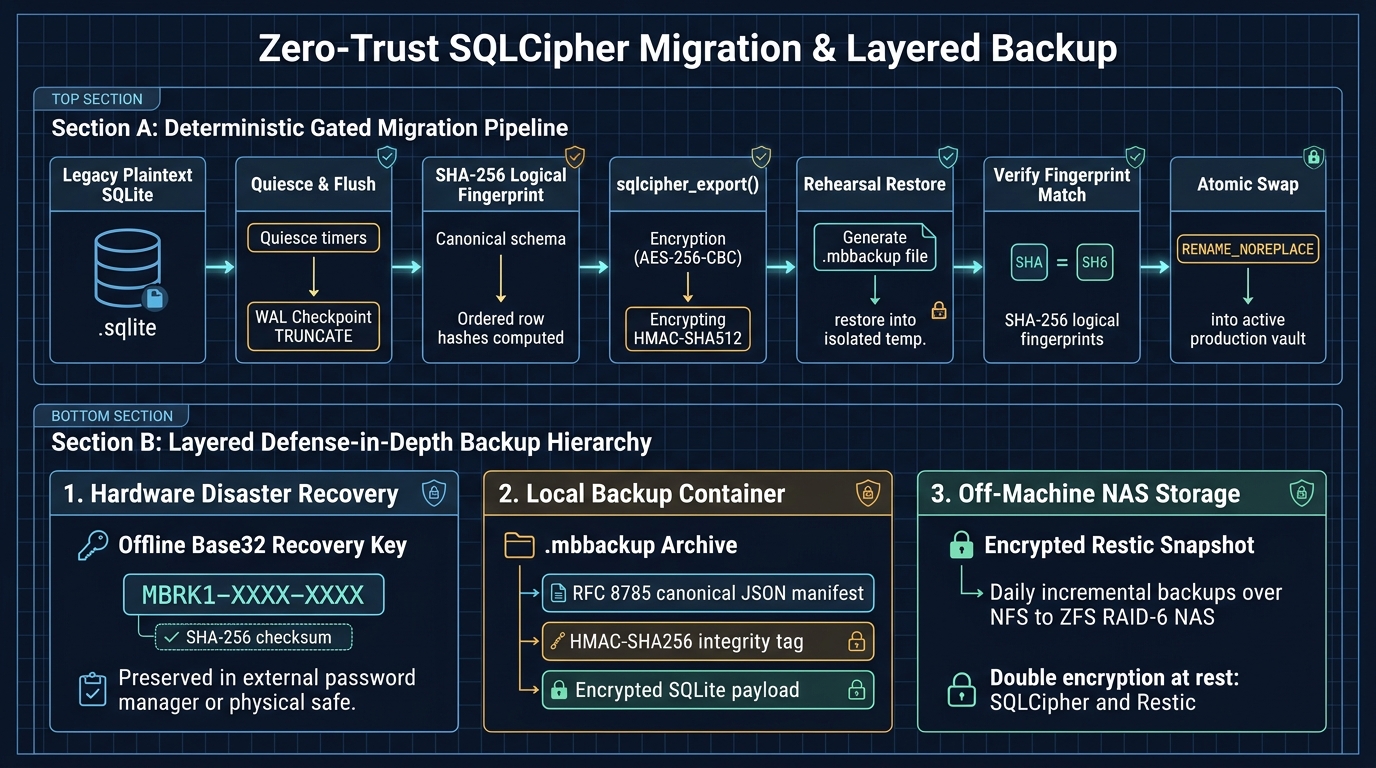
To prevent that, the backup and recovery strategy is split across three layers.
1. Offline recovery code with checksum verification
When the vault is initialized for the first time (enrollment), key-launcher generates the 256-bit key and, before sealing it into the TPM, prints a one-time Base32 recovery code to /dev/tty formatted as MBRK1-XXXX-XXXX-..., protected by a 5-byte SHA-256 checksum to catch transcription typos.
The enrollment flow forces you to re-enter that recovery code blind at the terminal prompt to prove you actually saved it (I keep mine in a secure note inside my password manager, off the machine) before it activates the vault. If my PC catches fire, I can run the package’s restore utility on a replacement machine, enter the MBRK1-... code, and restore the vault while re-sealing the key into the new computer’s TPM.
2. Authenticated .mbbackup containers with immediate restore rehearsal
Running a raw cp on an open SQLite file is a classic recipe for corrupt backups. Instead, the app produces a dedicated backup container (.mbbackup) that packages:
- A magic header (
MBBACKUP) plus format version; - A canonical JSON manifest (RFC 8785) recording the schema version, SQLCipher cipher profile, embedded document count, and the SHA-256 logical fingerprint of all records;
- The encrypted SQLCipher database payload;
- A 32-byte
HMAC-SHA256authentication tag over the header, manifest, and payload, using a subkey derived viaHKDF-SHA256.
Here is the crucial detail: every single time a backup file is created, the backup function immediately opens the newly written .mbbackup file, restores it into an isolated temporary directory, verifies the HMAC tag, and checks that the restored logical fingerprint matches the live database before reporting success. A backup that hasn’t been tested on restore does not exist.
3. Daily off-machine NAS backups with double encryption
Finally, keeping backups only on the same NVMe drive as the live database leaves you exposed to disk failure or ransomware.
At home I run my NAS servers in RAID-6 (including the QNAP ZFS RAID-Z2 array I evacuated my data to after I almost lost 90 TB of data when two drives in my old Synology failed at the same time during a rebuild, alongside the rebuilt RAID-6 Synology itself). Every night at 3:00 AM, a systemd timer on my workstation runs Restic to push an incremental encrypted snapshot of my data and project folders over NFS to the NAS, keeping a lean rotation of daily, weekly, and monthly snapshots (3 daily, 3 weekly, and 2 monthly).
Notice the defense in depth here: even if someone breached my local network, compromised the NFS share, or physically walked out of my house with the NAS hard drives, they would face an encrypted Restic repository; and even if by some miracle they had the Restic password, the database file inside the snapshot is already an encrypted SQLCipher vault whose key is sealed inside my workstation’s TPM.
Conclusion: security as continuous risk management
How secure does all of this make my app? It makes it secure enough for my threat model, knowing that absolute security simply does not exist in the real world.
In the project’s own architecture decision record (ADR 0001), I explicitly documented the residual risks I chose to accept:
- I keep Secure Boot disabled on my workstation because of my custom Linux boot and driver workflow; as a result, TPM sealing protects against disk theft and unprivileged user processes, while leaving physical evil-maid tampering of the unverified boot chain outside the protection boundary.
- The nested Wayland compositor (
cage) isolates the browser onwayland-bank, yetcageitself is still a client of the host session compositor (Hyprland/wlroots). A malicious process running under my UID on the host could still invoke compositor screencopy protocols (zwlr_screencopy_v1/ext_image_copy_capture_v1, such asgrim) while the bank window is visible, or read a password from the host clipboard before it is cleared after pasting. - At runtime,
key-launcherverifies (viaO_NOFOLLOW) that the installed binaries under/usr/lib/...are owned byroot:root, preventing a user-UID process from swapping out the installed executable. Because I develop the app on the same workstation under my normal UID, however, malware running as my user could attempt to tamper with the git working tree or build wrappers (cargo/makepkg) ahead of the nextpacman -Uupgrade, which requires reviewinggit statusand the diff before packaging. - Deleting the old plaintext database on a modern SSD with a Copy-on-Write filesystem (like Btrfs) unlinks the file from the OS namespace, whereas flash controller wear-leveling may retain old physical blocks until they are eventually overwritten.
- While the vault is unlocked during an active session, malware that has already achieved root or kernel code execution on my live host can bypass userspace controls.
This is where most people get security wrong. People tend to think of security as a binary on/off switch: either a system is “secure” or it is “insecure”.
In reality, security is a continuous risk assessment game: “how much are you willing to secure, and at what cost in money, complexity, and usability?”.
The only “perfectly secure” computer is one unplugged from the wall, stripped of its network card, and encased in a block of concrete at the bottom of the ocean (and it is also completely useless).
The moment your app needs to connect to your bank over the internet to fetch a statement, it is already imperfect by definition. From that point onward, our job as engineers is to stack layered mitigations (encryption at rest, hardware-sealed keys, privilege drop, namespace isolation, per-UID firewalling, networkless parsing, verified backups) and consciously evaluate how much residual risk remains after each mitigation.
Artificial intelligence is fantastic at scanning for known vulnerabilities and even writing the code for these mitigations when you know what to ask for. Even so, AI will never invent your threat model for you, and it will certainly not save you from your own ignorance.
If you blindly ask an AI agent to vibecode an application and trust its output 100% without understanding Linux permissions, process isolation, memory, networking, and cryptography, your app is inherently insecure by default. Study the fundamentals, question the happy path, and build security into your code from your very first hello world.