Installing Omarchy 2.0 from Scratch - Personal Notes
I’ve been recommending DHH’s Omarchy 2.0 to anyone who wants a lightweight, beautiful, and fully-equipped development environment. It’s a set of configs for Hyprland running on top of Arch Linux and it ships with smart defaults ready to use. Watch the video tour showing the main features.
In my case, I spent 10 years using Manjaro GNOME as my daily driver. Manjaro is an Arch derivative. The reason was the easier install and the pre-made configs. But these days, with archinstall, I don’t think it’s worth it anymore. I know there are other derivatives, but it’s better to stick with the original.
For Ubuntu folks or those coming from Debian derivatives, Fedora, etc, there’s a small learning curve on the package manager: Pacman and Yay instead of Apt or Dnf. But once you understand the AUR, you’ll never want anything else. It has literally everything you need, without having to deal with third-party repositories.
I took a while to test Omarchy because I was already using Hyprland before Omarchy was created. DHH previously had Omakub, which was a set of scripts to customize Ubuntu into a good development environment. I liked it, but since I preferred Manjaro, I made a fork called Omakub-MJ. After that I decided to uninstall GNOME and GDM and install another set of scripts called ML4W, which makes Hyprland look great as well. So Omarchy wasn’t that novel, for me.
The thing is, I’d been using the same Manjaro for years. It had a ton of old configs and scripts all mixed up. My Manjaro GNOME no longer even had GNOME. My Hyprland was a Frankenstein. The only barrier was my QEMU/Libvirt setup to run Windows with GPU passthrough, which is what I used to edit videos back when I was still posting on my YouTube channel.
But since I stopped editing videos, that Windows isn’t as important anymore. I had another Windows VM with GPU passthrough for games. But currently I have a separate mini-PC with Windows that I use just for games. I also had another VM with another Linux just for my AI experiments, but since then I migrated to running natively while isolating everything with Docker. In other words, my VMs are no longer important. Check my previous blog posts to learn about AI in Docker.
With the release of Omarchy 2.0, it looks like a good time to reinstall Arch from scratch with Omarchy on top and start over clean and beautiful.
1 - My Setup
Every case will be different. This post’s main purpose is to serve as my personal reference for the future, in case I need to reinstall everything again.
No, I’m not going to use NixOS. I really don’t think it’s worth it. It only pays off if you’re a computer lab admin or server infrastructure admin and your day-to-day involves rebuilding identical setups reliably. For a normal user who only reinstalls every 2 or 3 years, the learning curve and maintenance work aren’t even remotely worth it. It’s a waste of time. I’d spend days learning now, finish the setup, go 2 years and I’d already have forgotten everything. Arch Linux by itself is stable enough that I don’t need this.
My setup is still the same from the days I was editing videos for the channel. It’s a Ryzen 9 7850X3D with 16 cores, 32 threads, 5GHz peak. It’s still an excellent CPU with power to spare for my use cases, which is why I don’t see myself wanting to upgrade anytime soon. It’s rare for me to saturate all those cores at those speeds at the same time. Better yet: it has an integrated AMD GPU which makes installing Linux a thousand times easier than if I had NVIDIA.
But I also have a separate discrete GPU, the NVIDIA RTX 4090 (no, I don’t need a 5090, it has the same amount of VRAM). It’ll stay for secondary tasks and not for carrying my graphical environment. Things like Cycles rendering in Blender, or running LLMs with ollama and the like. Before I used GPU passthrough to a VM in QEMU/Libvirt to run Windows in parallel with Linux. Both to edit videos and to game.
Since I no longer edit videos, I don’t need this complicated setup, so I won’t bother installing Libvirt back. If I need Windows, I’ll leave it in dual boot. If I need to edit video, these days we have DaVinci Resolve Studio which runs natively on Linux (a thousand times better than Adobe Premiere). For games I have a separate mini PC with an RTX 4060 hooked up to my TV. The best thing is to have a totally separate PC for games.
So this setup is meant to be pure Linux, with access to my Synology DS 1821+ NAS with 100TB. The only extra thing I’ll need is to configure NFS mounts, as I’ve already detailed in this other post.
One detail is that I have 4 NVMEs in this PC. 2TB for my old Linux. 2 TB for dual boot/Windows VM. 2 TB just as a Steam drive and 1 TB for random stuff. Since I’m wiping the Steam VM, I also no longer need to dedicate an entire NVME just for that. Instead, I’ll make the new Linux’s “/home” directory this entire 2 TB.
This will let me stop worrying about Docker filling my drive and freezing my entire system from lack of space. Last time I had “solved” this by making a remote drive with iSCSI on my NAS (which has infinite space). Since removing my Steam VM will give me 2TB back, I’ll solve the problem locally and with fewer configurations.
RAM I have in spades, 96GB of DDR5. With that, I also don’t need to worry about a swap partition. Swap only matters if you have less than 32GB of RAM, if you’re running lots of Docker and keep hitting the max RAM consumption very fast. Or if you’re on a laptop and want the option of hibernation (being able to record RAM to disk, fully power off the machine, and come back later exactly where you left off — which is different from suspend, which still uses power).
If you want to hibernate, you need a bit more than the size of your RAM. So if you have 32GB, it’s good to leave a margin, around 34GB or more of swap. Since my PC is a desktop at home, I don’t need hibernation, just enable ZRAM for the rare cases where there’s a spike over 96GB (which is super rare). Plus, it’s easier for me to just bump up to 128GB of RAM if I really need it. Swap to compensate for RAM only pays off on laptops that don’t have room for more real RAM.
2 - Why Omarchy?
As I said, I’ve been an Arch user for a decade and I don’t see any package repository bigger and more complete than the AUR. The only other repository that actually competes is NixOS’s. But since Nix is ruled out for my use case, the AUR remains unbeatable.
Arch has Pacman as its package manager. To access the AUR you need a second manager. There are several like the old Pacaur, Paru, and many others. But the best, in my opinion, is Yay. It has exactly the same syntax as Pacman and replaces Pacman. In practice, we just use Yay for everything.
To search packages by name just do yay -Ss spotify.
To remove packages just do yay -Rns spotify.
To update all system packages just do yay -Syu
To remove orphan packages that pile up over time just do sudo pacman -Rns $(pacman -Qdtq)
And those are the commands I use 99% of the time.
I’ve already used every type of desktop manager out there: GNOME (which behaves more like a Mac), KDE (which behaves more like Windows for power users), XFCE (which is GTK-based and lighter), Cinnamon (also GTK-based), i3 (which is a tiling window system), Sway (like i3, also tiling but if I’m not mistaken was designed with Wayland in mind).
In practice, everyone uses apps in two ways: a full-screen window or 2 vertical windows splitting the monitor in the middle (editor on one side, browser on the other), or 3 windows (a vertical editor taking half the monitor, a browser taking 1/4, and a terminal taking another 1/4). Then we organize more open apps into virtual desktops/workspaces. That’s the easiest way to work.
This means being able to drag floating windows is a waste of time. I prefer that windows already open sized into one of these layouts I mentioned above. You can configure GNOME or KDE to do that. But it smells like a kludge. Instead it really is better to use i3 or Sway.
Setting controversies aside (yes, I’m a bit wary of Wayland and I like that XLibre exists). But it’s a fact that X11 is behind the times and is a very old and complicated architecture. Wayland really does have a better “appeal,” despite having taken a while to round off basic things like screen sharing (OBS, Zoom). But I’ve been using Wayland for some years now without headaches. These days I’d say it’s pretty stable. I’ve been using GNOME on Wayland for a long time. I don’t stop using things because I’m wary of them: with technology I’ll always be absolutely promiscuous and use everything.
Knowing I’ll use Wayland and knowing I want automatic window layouts, and don’t need floating windows, the best is a desktop manager with a tiling windows system (tiles are “azulejos” and we’re talking about tiles being side by side and never one on top of another), which organizes windows side by side in a smart and automatic way.
In this case we only have 2 options: Sway or Hyprland (either one is good). Hyprland, installed from scratch, is completely bare — it has absolutely nothing. We need to configure everything through files in .config/hypr. It’s simple enough, but it’s work.
The only good option for having a pre-configured and well-done Hyprland was ML4W, which I was already using. But now we have Omarchy, which installs and pre-configures everything to work smoothly on Hyprland. This is the best option we have today.
Besides configuring Hyprland to work with Waybar, Rofi, and other components, it has its own system for switching themes and styles to leave the system with the “look and feel” you want (and all the ones that come with it are super pretty), but it also installs things I’ve been using for a long time like Neovim with the LazyVim package (in my opinion, the easiest way to make Neovim not fall short compared to VS Code), Mise (the best way to organize development environments to have multiple versions of your favorite programming language).
If you’re installing a distro from scratch, the only two things you need to have are Mise and LazyVim. Plus Docker and LazyDocker. That’s enough to start a productive development environment. And Omarchy already brings all of that pre-configured. No one “needs” Omarchy, but it already brings everything integrated and beautiful. So why bother doing everything from scratch to end up almost the same?
Also, this is Linux. Don’t like one of the components? Just swap it out.
3 - Back Up
The vast majority of everything I have already lives on the remote server, my 100TB Synology NAS. That already helps a lot. Even so, there’s still a good amount of stuff locally on my PC, so the first thing to do is copy everything to the NAS. If you don’t have a NAS, then an external HD. Any server will do; the important thing is to guarantee you won’t lose anything before installing a new OS from scratch.
Don’t forget directories like .config or .local. It’s better to do an rsync -avz --progress .config /mnt/nas/backup/, for example, and copy everything. Even what you think you won’t need. Better to copy more than to be missing stuff. As a rule, the ideal is to copy everything in your $HOME to an external drive or NAS.
Just to make sure I won’t forget anything important, I’m also going to record a list of all the packages I have installed on my old system:
yay -Q > pacotes.txt
flatpak list > flatpak.txt
Also making sure I won’t lose old configs of services I made in systemd, so also copy everything from /etc/systemd/system. It’s also worth recording things like /etc/fstab. Also don’t forget to back up your SSH keys with tar cvfz ssh.tgz ~/.ssh!!
If, like me, you were using QEMU/Libvirt for VMs, it’s good to save the configs of the virtual machines you used. Usually the tool to manage VMs is virsh, so I just did:
sudo virsh list --all
sudo virsh dumpxml <vmname> > <vmname>.xml
If I want to recreate the machines in the future, it will all be in the backup. In my case I keep all virtual drives on my NAS, but if yours are local, you also need to save those files that live in /var/lib/libvirt/images/
rsync -avh --progress /var/lib/libvirt/images/ /backup/libvirt-images/4 - Is Installing Arch Hard?
Arch, less than Gentoo, has always had a reputation for being the most brutal Linux distro for a beginner to install. That’s not a lie, but the truth is Arch is simultaneously the hardest distro and also the easiest.
Download the official ISO and burn it to a USB drive (on Windows, using Rufus or Balena Etcher). Now press F12 (depends on your BIOS) or configure the BIOS directly to boot from the USB drive. Doing that loads the Arch live environment, which is literally dropping into a command line. With no further help.
From this point you have to follow the Installation Wiki from the excellent ArchWiki and learn how to install a Linux from absolute scratch using only the command line, step by step, through trial and error (more erring than hitting the mark), and in the end you’ll have a much better feel for how a Linux distro actually works.
I didn’t make an Arch video but I did make videos of Slackware to explain how a package manager works. I also made a Gentoo video to show how a distro that compiles everything from scratch works. And I made a video about how the Linux Boot Works to understand where the kernel lives and how it’s structured. But I didn’t make an Arch video because I always left it as an exercise for beginners.
The manual way is viable, but if you’re used to a graphical installer, like Calamaris, which most more popular distros like Ubuntu or Fedora have, you’ll be totally lost. But here comes the bonus: you don’t need to go through all of that to have Arch Linux on your machine.
For that there’s archinstall.
When you boot the Arch USB and drop into the command line, just type archinstall and you’re done — just follow the step by step it provides (which I consider even simpler than Calamaris) and it will install and configure everything automatically for you, the same way installing Fedora or any other distro is. Seriously, it shouldn’t take more than 15 minutes.
archinstall looks like this:
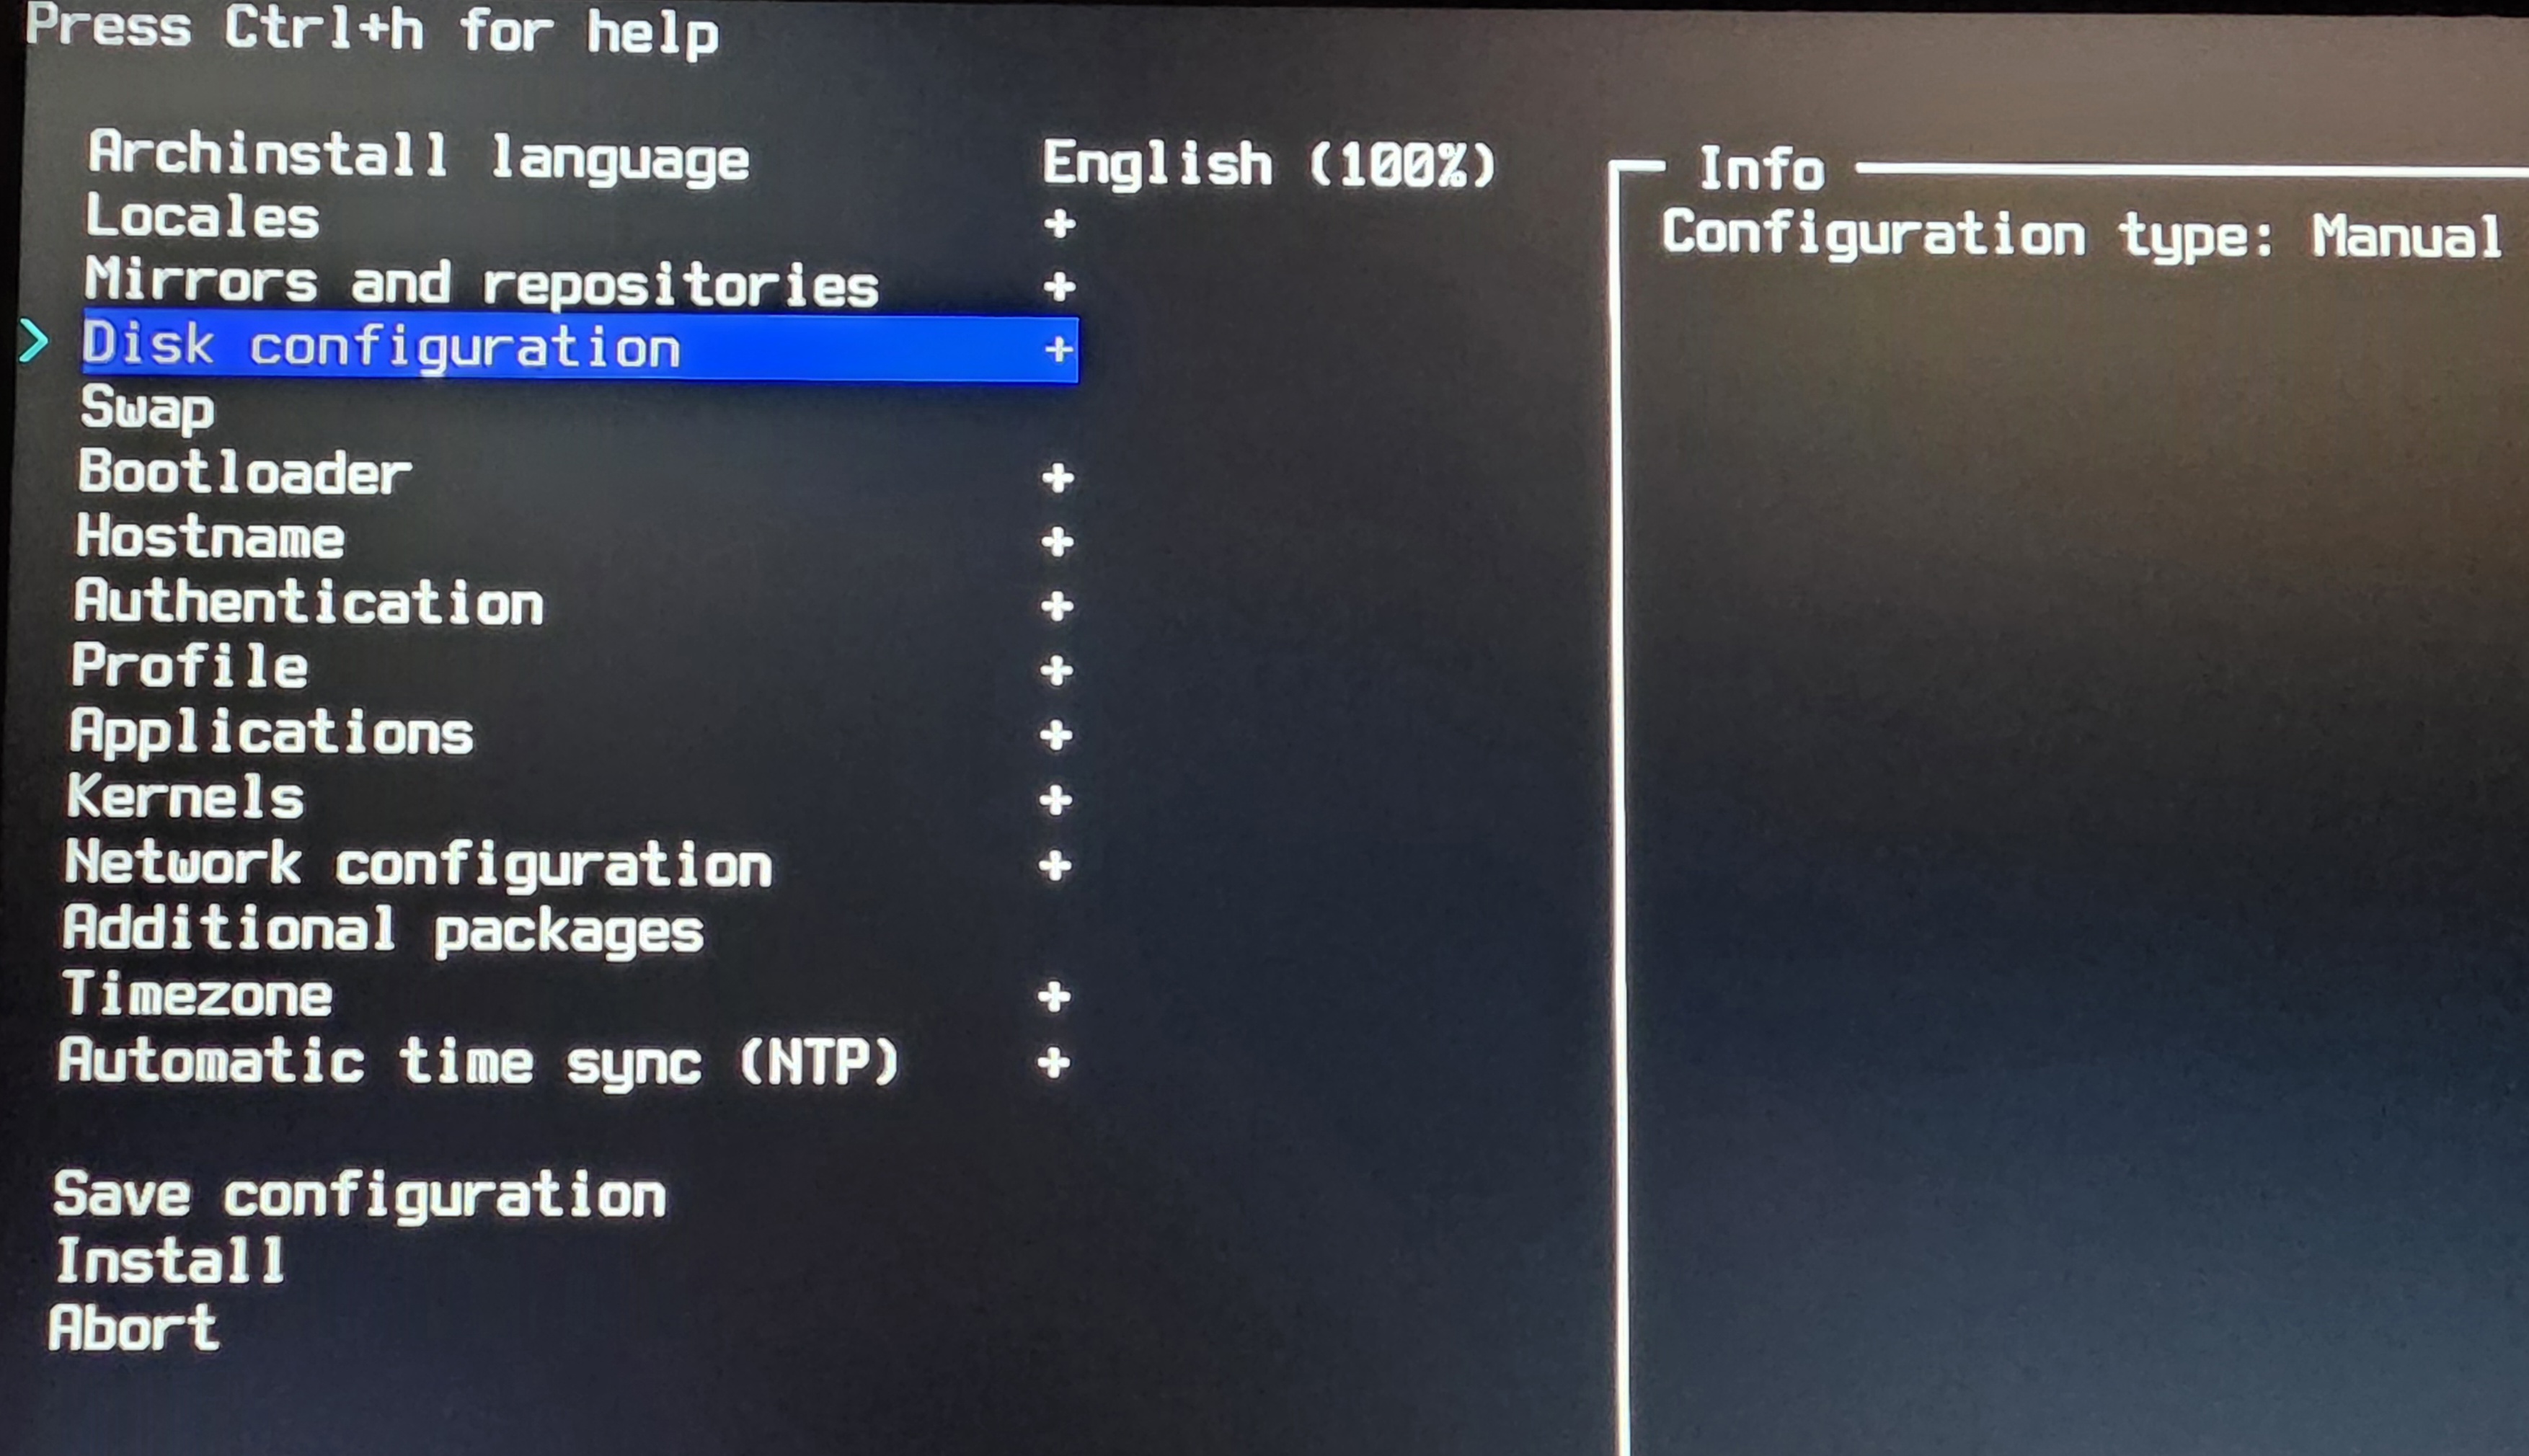
Just go into each of the items on the left and fill in your choices. Configure things like keyboard layout (I normally choose ‘us-acentos’). Edit the hostname of your machine. Choose “NetworkManager” in network configuration (it will configure both ethernet and wifi for you), add Bluetooth and Audio support (choose “Pipewire”). Choose the “desktop” type instead of “minimal” to already get the main packages needed for a desktop. Choose the timezone (“America/Sao_Paulo” in my case).
I also recommend choosing the Hyprland option, I think under Applications or Additional Packages. It will install SDDM to give you a graphical login.
Only two options need more attention: for bootloader, many will be tempted to use Limine, which is more modern and lightweight. But I still recommend using GRUB, I’ll explain why in a moment.
The second important option is “Disk Configuration”. Don’t worry, unlike fdisk, it’s super intuitive. Just choose the correct drive where you want to install (if you have dual boot, careful not to wipe your Windows). Then let it do the automatic partition layout (only edit manually if you have some very special need). Most importantly, choose BTRFS instead of the traditional ext4.
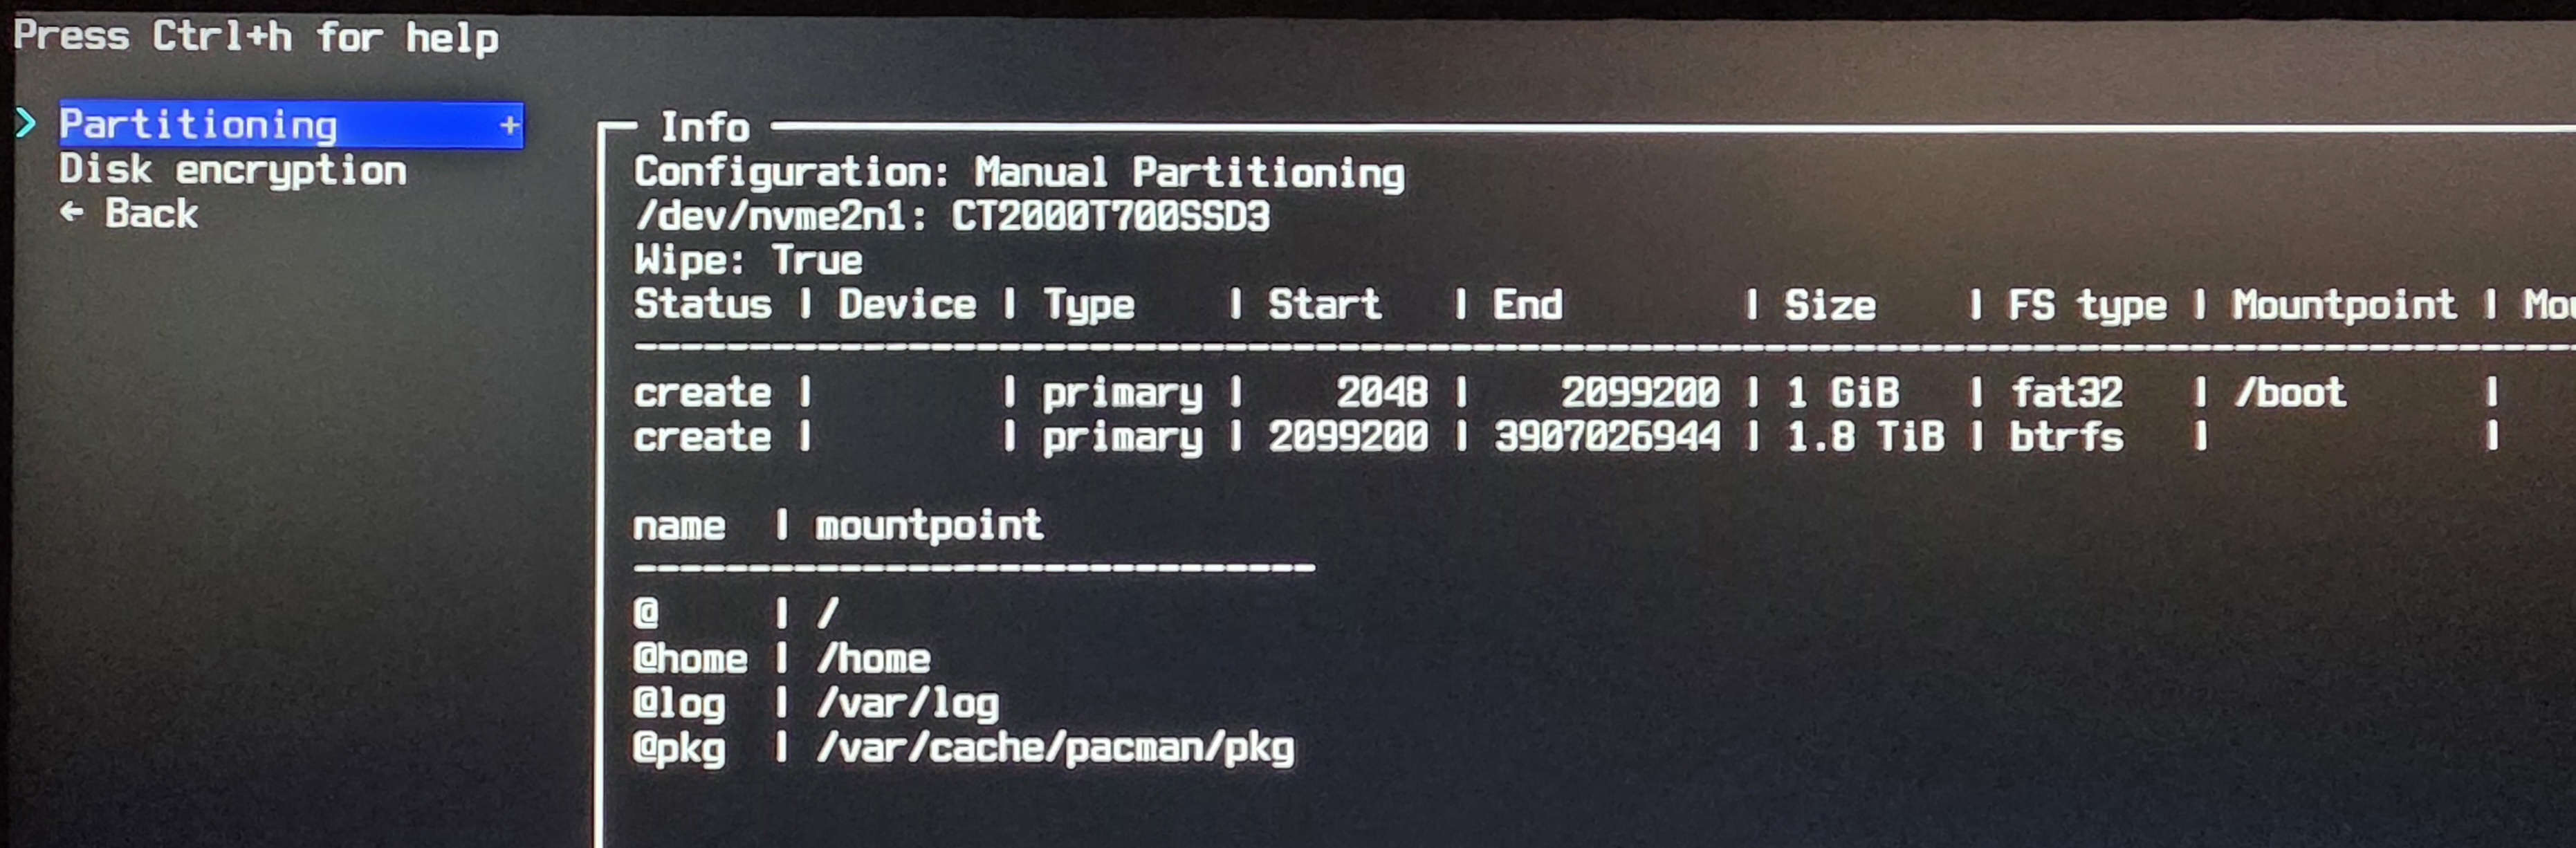
Every Linux always formats its Linux partitions with ext4, which is the oldest, most stable, and best-documented file system. These days I recommend BTRFS; it’s much more modern, safer (has better corruption protection systems), uses less space (learn about CoW - Copy on Write), and most importantly: it has cheap snapshot support (think of Apple Time Machine, only better). It has most of the features of a file system dedicated to a file server but is much simpler and more intuitive to use than the monster that is ZFS (I don’t recommend it for normal users).
It has some maintenance needs that are worth reading about in the Wiki to learn. But overall it’s plug and play, install and forget. In the next sections I’ll show some things you need to know, but trust me: choose BTRFS.
I know Omarchy 2.0 has an option for a pre-configured ISO which I imagine is normal Arch with archinstall and Omarchy on top all at once. But I don’t know if they allow this choice, which is why I preferred going straight to pure Arch first. In the end the effect is the same. Comment below later if the Omarchy ISO also has the same options. Just make sure in the end you have BTRFS. Future you will thank you.
5 - Separate HOME
As I explained before, I used one of my 4 NVMEs as the Linux drive. But now I’ve freed up another NVME and want to move my $HOME there and have 2 TB dedicated just to user space.
I won’t explain how to partition and format that other drive. It’s simple: just use fdisk or later install Gparted which is the graphical version of the parted tool that you can use from the command line. There are several options. The important thing is just to wipe my old Windows partition and also format it with BTRFS.
Each person will have different device and partition names than mine. To find out which are yours, use the lsblk command. See my example:

In my example nvme1n1 is the 1TB drive for random stuff. nvme2n1 is my new Arch Linux. nvme0n1 is the old Windows dual boot drive. nvme3n1 is the Steam drive I formatted with BTRFS to become my new HOME drive.
If you didn’t get it, HOME is the /home/akitaonrails directory. It will live on a separate drive. After archinstall finishes and I boot into the new Linux, I just do the following:
sudo mount -t btrfs /dev/nvme3n1p1 /mnt
sudo btrfs subvolume create /mnt/@home
rsync -aAXHv /home/ /mnt/@home/
sudo umount /mnt
This mounts the new partition, then we use the “btrfs” command to create a new sub-volume called “@home” (again, read the BTRFS Wiki to understand concepts like sub-volumes).
The commands above create the sub-volume and copy everything from the old HOME to the new. Now we need /home to be mounted on this new partition at boot. For this we need to know the UUID of that partition:
~ ❯ sudo blkid /dev/nvme3n1p1
/dev/nvme3n1p1: LABEL="HOME" UUID="84e9a1b7-a30e-...
The blkid command returns the unique UUID of each partition and, with that, we can edit the /etc/fstab file using sudo nvim or sudo nano or the editor of your choice:
# /etc/fstab
...
# /dev/nvme2n1p2
# UUID=da3aea43-...-aeaf8c7224d7 /home      btrfs      rw,relatime,ssd,discard=async,space_cache=v2,subvol=/@home 0 0

# /dev/nvme3n1p1
UUID=84e9a1b7-...-7a6a17fd0395 /home      btrfs      rw,relatime,ssd,discard=async,space_cache=v2,subvol=/@home 0 0
...
See how I commented out the old line that mounted /home and added a new line with the new UUID. The rest is all the same. And that’s it, just boot and from now on my /home will mount on the new drive. Now I have 2 TB dedicated just to my junk downloads lol 🤣
But not only that, I also have space for big things like Docker images or LLM models, without risking filling the operating system drive and running the risk of it no longer booting due to lack of space — as has happened to me several times in the past. Always remember to do maintenance on Docker and LLMs and delete old things.
Speaking of which, BTRFS supports snapshots. And one of the basic mistakes is forgetting that Docker or LLM directories can end up in the snapshots and occupy space without you knowing. To avoid this it’s better to mark those directories to not enter the snapshots. For that we have to tell BTRFS to ignore those directories.
The correct way is to create separate subvolumes for them. For this I’ll mount that same partition on the separate drive where I mounted my $HOME:
~ ❯ sudo mkdir /mnt/temp
~ ❯ sudo mount -o subvolid=5 -t btrfs /dev/nvme3n1p1 /mnt/temp

~ ❯ ls /mnt/temp
 @home   timeshift-btrfs

~ ❯ sudo btrfs subvolume create /mnt/temp/@docker
Create subvolume '/mnt/temp/@docker'

~ ❯ sudo btrfs subvolume create /mnt/temp/@ollama
Create subvolume '/mnt/temp/@ollama'

~ ❯ sudo umount /mnt/temp
Now just edit /etc/fstab to mount correctly just like we did with HOME:
# /etc/fstab
...
# /dev/nvme3n1p1
UUID=84e9a1b7-...-7a6a17fd0395 /home      btrfs      rw,relatime,ssd,discard=async,space_cache=v2,subvol=/@home 0 0
UUID=84e9a1b7-...-7a6a17fd0395 /var/lib/docker      btrfs      rw,relatime,ssd,discard=async,space_cache=v2,subvol=/@docker 0 0
UUID=84e9a1b7-...-7a6a17fd0395 /var/lib/ollama      btrfs      rw,relatime,ssd,discard=async,space_cache=v2,subvol=/@ollama 0 0
...
Done, clean subvolumes. More important in my case: I moved directories that have a tendency to grow without control out of the operating system partition, making it harder to end up with an inaccessible system due to lack of space. Do the same with other similar directories, with things like Kubernetes, for example. Anything that keeps downloading large files, like system images.
Now just mount and bring things back:
# every time you edit fstab, run this:
sudo systemctl daemon-reload

# create the mount points
sudo mkdir /var/lib/docker
sudo mkdir /var/lib/ollama

# mount
sudo mount /var/lib/docker
sudo mount /var/lib/ollama

# copy the contents of the old directory back
sudo rsync -aHAX --inplace /var/lib/docker.old/ /var/lib/docker/
sudo systemctl start docker
Besides space management, what’s the other advantage of making separate subvolumes? Because the next section will be about making the system even more robust by adding snapshot and rollback capability to past snapshots. And the ideal is to keep huge files out of snapshots that will sit in the past. Docker images are easy to recover: just docker pull again, no need for backup.
6 - Installing Omarchy
This is the easiest part. When you’re done installing with archinstall, if you chose the Hyprland option, SDDM will appear for you to log in. And when you enter you’ll be shocked at how raw Hyprland is. You basically can’t do anything.
So this doesn’t become an entire day of manual configuration, we’ll use Omarchy. Hit “Super Enter” to open the terminal and don’t mind how ugly things look right now. It’ll get better.
In the terminal just do this:
curl -fsSL https://omarchy.org/install | bashJust follow the on-screen instructions and let it do the rest. And that’s it, done, there’s no next step.
I HIGHLY recommend you read the OMARCHY ONLINE MANUAL that DHH made. It’s very clean, simple, and direct. All the keyboard shortcuts, for example, are in the HOTKEYS section. Spend an hour reading the basics to be able to operate it. But by now you already have practically everything you need: Alacritty as terminal, Chromium as browser (you can install Brave if you prefer, as I do).
“Super Alt Space” opens the Omarchy main menu. “Super Space” opens Rofi to type the name of the app you want to open. “Super Enter” opens the terminal. “Super B” opens the browser and so on.
7 - Customizing Omarchy
Omarchy is a customized Hyprland. We can edit whatever we want directly in ~/.config/hypr. And since I was used to ML4W, I decided to tweak a bit to make it good for my setup. Your setup will vary depending on your needs.
Right after I finished installing Omarchy and tried to use Gparted to partition that second NVME of mine for HOME, it had an authentication problem. I don’t remember if this was the solution but it’s good to make sure you have Polkit installed:
# make sure polkit + agent exist
sudo pacman -S --needed polkit polkit-gnome xorg-xhost
# Hyprland: export full env to systemd user bus once
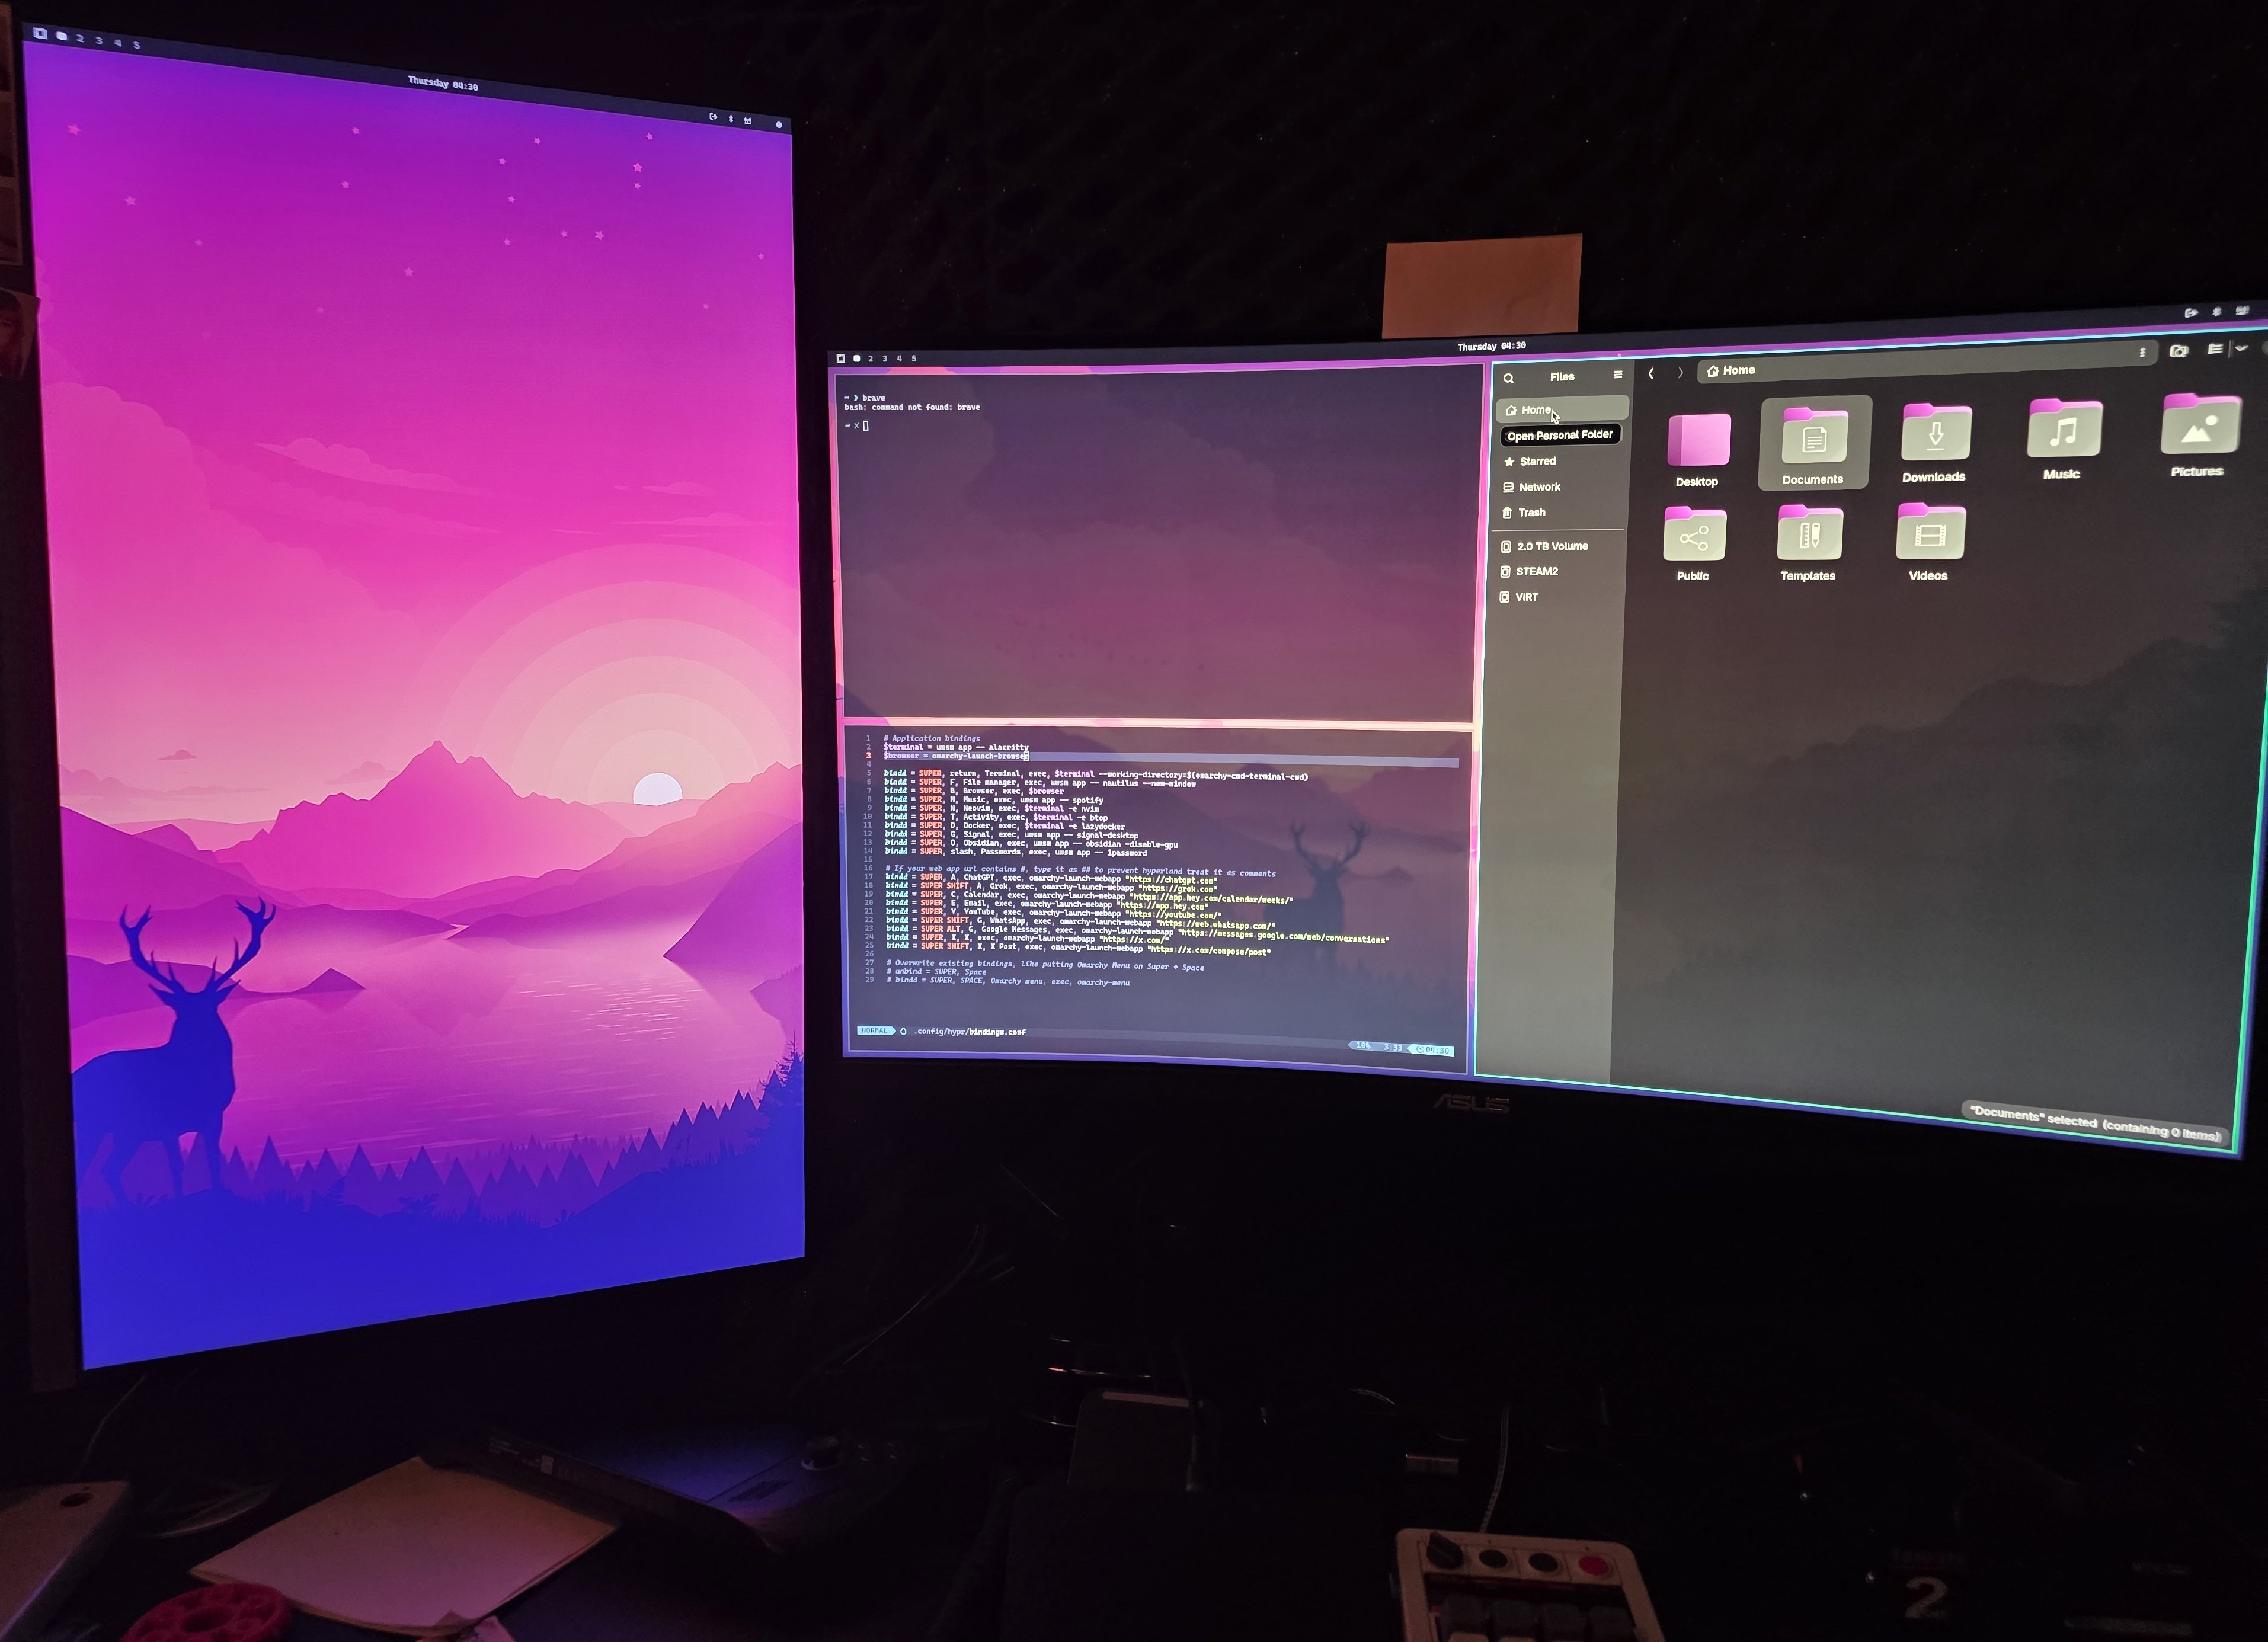
dbus-update-activation-environment --systemd --allBack to it, the first thing I need to solve is that I have 2 monitors. An Asus 32" 1440p 144fps as the main and another Samsung 24" 4K 60fps vertical on the left side. The way to configure this in Hyprland is by editing a file like ~/.config/hypr/monitors.conf which is normally loaded by ~/.config/hypr/hyprland.conf.
Instead of doing this manually, I prefer to install:
yay -S nwg-displays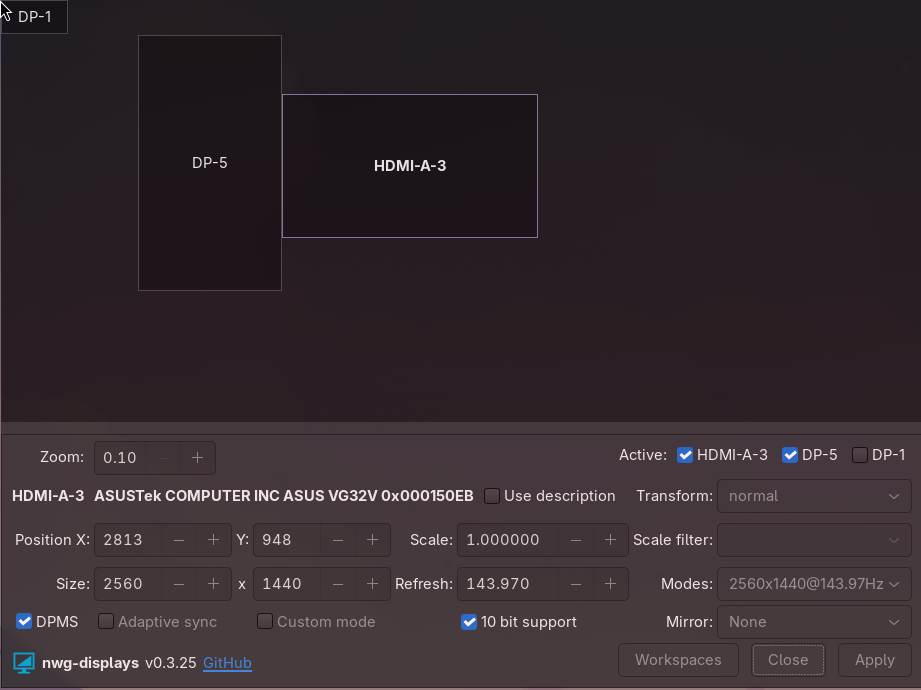
Here I configure things like transform 90 degrees to rotate the vertical monitor, resolution scaling, 10-bit color support, etc.
It will save two files: ~/.config/monitors.conf and ~/.config/workspaces.conf. Omarchy doesn’t load this second file, so we have to edit ~/.config/hypr/hyprland.conf to look like this:
...
# Change your own setup in these files (and overwrite any settings from defaults!)
source = ~/.config/hypr/monitors.conf
source = ~/.config/hypr/workspaces.conf`
...
I also took the opportunity to add some extra configurations in this file:
...
# animation
animations {
  enabled = yes
  bezier = easeOutQuint, 0.23, 1, 0.32, 1
  animation = workspaces, 1, 4, easeOutQuint, slide
  # optional extras:
  animation = specialWorkspace, 1, 4, easeOutQuint, slide
  animation = windows, 1, 4, easeOutQuint, popin 80%
  animation = fade, 1, 4, easeOutQuint
}

xwayland {
    force_zero_scaling = false # careful with mixing scaling wayland and x11
}

input {
  numlock_by_default = true
}

# dialogs/splash/utility ONLY
windowrulev2 = float,  xwayland:1, windowtype:^(dialog|splash|utility)$
windowrulev2 = center, xwayland:1, windowtype:^(dialog|splash|utility)$

# never center menus/tooltips
windowrulev2 = tile,   xwayland:1, windowtype:^(popup_menu|dropdown_menu|tooltip)$
Some people don’t like it but I like having a quick animation when I switch from one workspace to another, which is why I added the animations block.
When you use apps made for X11, they’ll run on top of XWayland. One annoying thing is that some of them open “dialog boxes,” which are floating windows. And they can end up in places hard to click, especially on a multi-monitor setup. That’s why I added blocks like xwayland and windowrulev2 rules to force those dialog boxes to always appear centered on screen.
Finally, I have an 8bitdo numpad keyboard connected via Bluetooth, but it doesn’t start up with numlock on. To fix this there’s that input block.
Back to the monitor layout. After nwg-displays generated the files, I still had to modify a bit for my case, like this:
# ~/.config/monitors.conf
# Generated by nwg-displays on 2025-08-28 at 14:30:17. Do not edit manually.

#monitor=HDMI-A-3,2560x1440@143.97,1080x407,1.25,bitdepth,10
#monitor=DP-5,3840x2160@60.0,0x0,1.875,bitdepth,10
#monitor=DP-5,transform,1
#monitor=DP-1,0x0@60.0,-1x-1,1.0
#monitor=DP-1,disable

monitor=HDMI-A-3,2560x1440@143.97,2813x948,1.0,bitdepth,10
monitor=DP-5,3840x2160@60.0,1373x350,1.5,bitdepth,10
monitor=DP-5,transform,1
monitor = DP-1,disable
The monitor file I didn’t have to change anything, really, just remember to disable that DP-1 that appears on my main monitor (I think it’s its DisplayPort, but I use HDMI, so I have to disable DP-1).
# ~/.config/workspaces.conf
# Generated by nwg-displays on 2025-08-28 at 13:07:02. Do not edit manually.

workspace=5,monitor:DP-5,persistent:true
workspace=1,monitor:HDMI-A-3,persistent:true
workspace=2,monitor:HDMI-A-3,persistent:true
workspace=3,monitor:HDMI-A-3,persistent:true
workspace=4,monitor:HDMI-A-3,persistent:true
This one I also didn’t have to change much, in nwg-displays itself I said which workspaces I want on each monitor. In my personal preference I prefer to leave the vertical monitor only with workspace 5 and the others on the main monitor. The difference here was that I added those persistent:true options on all of them, to guarantee that everything will work correctly with the workspaces “pinned” in the right places. Workspaces in Hyprland are quite dynamic; it’s worth reading the documentation later if you want more complicated cases.
This solves my two-monitor setup the way I prefer. Experiment with things like scaling until everything is okay for your setup.
Next I needed to solve the hotkeys (key bindings). I’m used to some combinations that came from ML4W so I decided to copy them directly into ~/.config/hypr/bindings.conf. First, switch chromium for Brave:
# Application bindings
$terminal = uwsm app -- alacritty
$browser = brave # omarchy-launch-browser
...
Then I added a bunch of binds at the end of the same file:
unbind = SUPER, V
bind = SUPER, V, swapsplit
bind = SUPER, M, fullscreen, 1                                                           # Maximize Window
bind = SUPER, T, togglefloating                                                          # Toggle active windows into floating mode
bind = SUPER SHIFT, right, resizeactive, 100 0                                           # Increase window width with keyboard
bind = SUPER SHIFT, left, resizeactive, -100 0                                           # Reduce window width with keyboard
bind = SUPER SHIFT, down, resizeactive, 0 100                                            # Increase window height with keyboard
bind = SUPER SHIFT, up, resizeactive, 0 -100                                             # Reduce window height with keyboard

# Display
bind = SUPER SHIFT, mouse_down, exec, hyprctl keyword cursor:zoom_factor $(awk "BEGIN {print $(hyprctl getoption cursor:zoom_factor | grep 'float:' | awk '{print $2}') + 0.5}") # Increase display zoom
bind = SUPER SHIFT, mouse_up, exec, hyprctl keyword cursor:zoom_factor $(awk "BEGIN {print $(hyprctl getoption cursor:zoom_factor | grep 'float:' | awk '{print $2}') - 0.5}") # Decrease display zoom
bind = SUPER SHIFT, Z, exec, hyprctl keyword cursor:zoom_factor 1 # Reset display zoom

# Workspaces
bind = SUPER, 1, workspace, 1 on HDMI-A-3 # Open workspace 1
bind = SUPER, 2, workspace, 2 on HDMI-A-3  # Open workspace 2
bind = SUPER, 3, workspace, 3 on HDMI-A-3 # Open workspace 3
bind = SUPER, 4, workspace, 4 on HDMI-A-3 # Open workspace 4
bind = SUPER, 5, workspace, 5 on DP-5 # Open workspace 5

bind = SUPER SHIFT, 1, movetoworkspace, 1  # Move active window to workspace 1
bind = SUPER SHIFT, 2, movetoworkspace, 2  # Move active window to workspace 2
bind = SUPER SHIFT, 3, movetoworkspace, 3  # Move active window to workspace 3
bind = SUPER SHIFT, 4, movetoworkspace, 4  # Move active window to workspace 4
bind = SUPER SHIFT, 5, movetoworkspace, 5  # Move active window to workspace 5

bind = SUPER, Tab, workspace, m+1       # Open next workspace
bind = SUPER SHIFT, Tab, workspace, m-1 # Open previous workspace

bind = SUPER CTRL, 1, exec, $HOME/.config/hypr/moveTo.sh 1  # Move all windows to workspace 1
bind = SUPER CTRL, 2, exec, $HOME/.config/hypr/moveTo.sh 2  # Move all windows to workspace 2
bind = SUPER CTRL, 3, exec, $HOME/.config/hypr/moveTo.sh 3  # Move all windows to workspace 3
bind = SUPER CTRL, 4, exec, $HOME/.config/hypr/moveTo.sh 4  # Move all windows to workspace 4
bind = SUPER CTRL, 5, exec, $HOME/.config/hypr/moveTo.sh 5  # Move all windows to workspace 5
Note that the last block of scripts needs a script to move all windows at once to another workspace. I copied this moveTo.sh from ML4W’s GitHub and placed it directly in ~/.config/hypr. Don’t forget to give execute permission with chmod +x moveTo.sh afterwards.
The various workspace ones below are how I prefer to move workspaces and move apps to different workspaces.
Omarchy already comes with “SUPER J” to change the orientation of windows, for example, if there are two horizontal windows one on top of the other, with SUPER J they become vertical, but “SUPER V” was missing which I added for “swapsplit” which is swapping windows’ places.
I also like “SUPER M” to temporarily make one of the windows full screen, and “SUPER T” to temporarily make a window floating (like a calculator, for example). I had to unbind the previous SUPER M that opened Spotify, but I barely use Spotify on desktop so I don’t need it. When I want to open that app, I go to SUPER SPACE to open Rofi and type it there.
If you have questions about the default combinations, Omarchy has “SUPER K” to open a window with help for all of them.
I still haven’t modified combinations for specific applications. The ones that come with Omarchy are already very useful, like SUPER A to open ChatGPT as if it were a separate app, or SUPER CTRL A to open Grok in a separate window. SUPER O to open Obsidian is also very useful for me. I recommend playing with these binds to make specific bindings and, again, reading the manual to learn everything else it already brings. But up to here it’s enough to leave Hyprland the way I like to use it.
8 - Timeshift, Snapshots and GRUB
Remember I said to choose GRUB in archinstall? It’s time now. The goal: let the system make periodic snapshots of itself, and in case you install some corrupted package or do things on your system that prevent it from booting, instead of having to resort to a USB drive to try to boot and diagnose the error, it’s easier to just boot, choose a snapshot right before the destructive operation, and come back intact.
Before proceeding, an adjustment I think is important: my 4K monitor makes GRUB letters too small for me to read. I prefer bigger letters. Fortunately GRUB uses bitmap fonts so I can use any. I did the following:
sudo grub-mkfont -s 48 -o /boot/grub/fonts/caskaydia48.pf2 /usr/share/fonts/TTF/CaskaydiaMonoNerdFont-Regular.ttfThis will generate a font in the format that GRUB can load. Choose any one you like; Omarchy already pre-installs several very good ones like JetBrains’s. If size 48 is too big, lower it to 32, experiment until it’s the way you like.
Then just edit /etc/default/grub to, at the end, have this line:
GRUB_FONT=/boot/grub/fonts/caskaydia48.pf2And now just regenerate the bootloader:
sudo grub-mkconfig -o /boot/grub/grub.cfgEvery time yay -Syu brings a kernel or driver update, GRUB will be regenerated with the same font. Look at how it turned out for me, I think it looks much better (this is a 4K monitor):
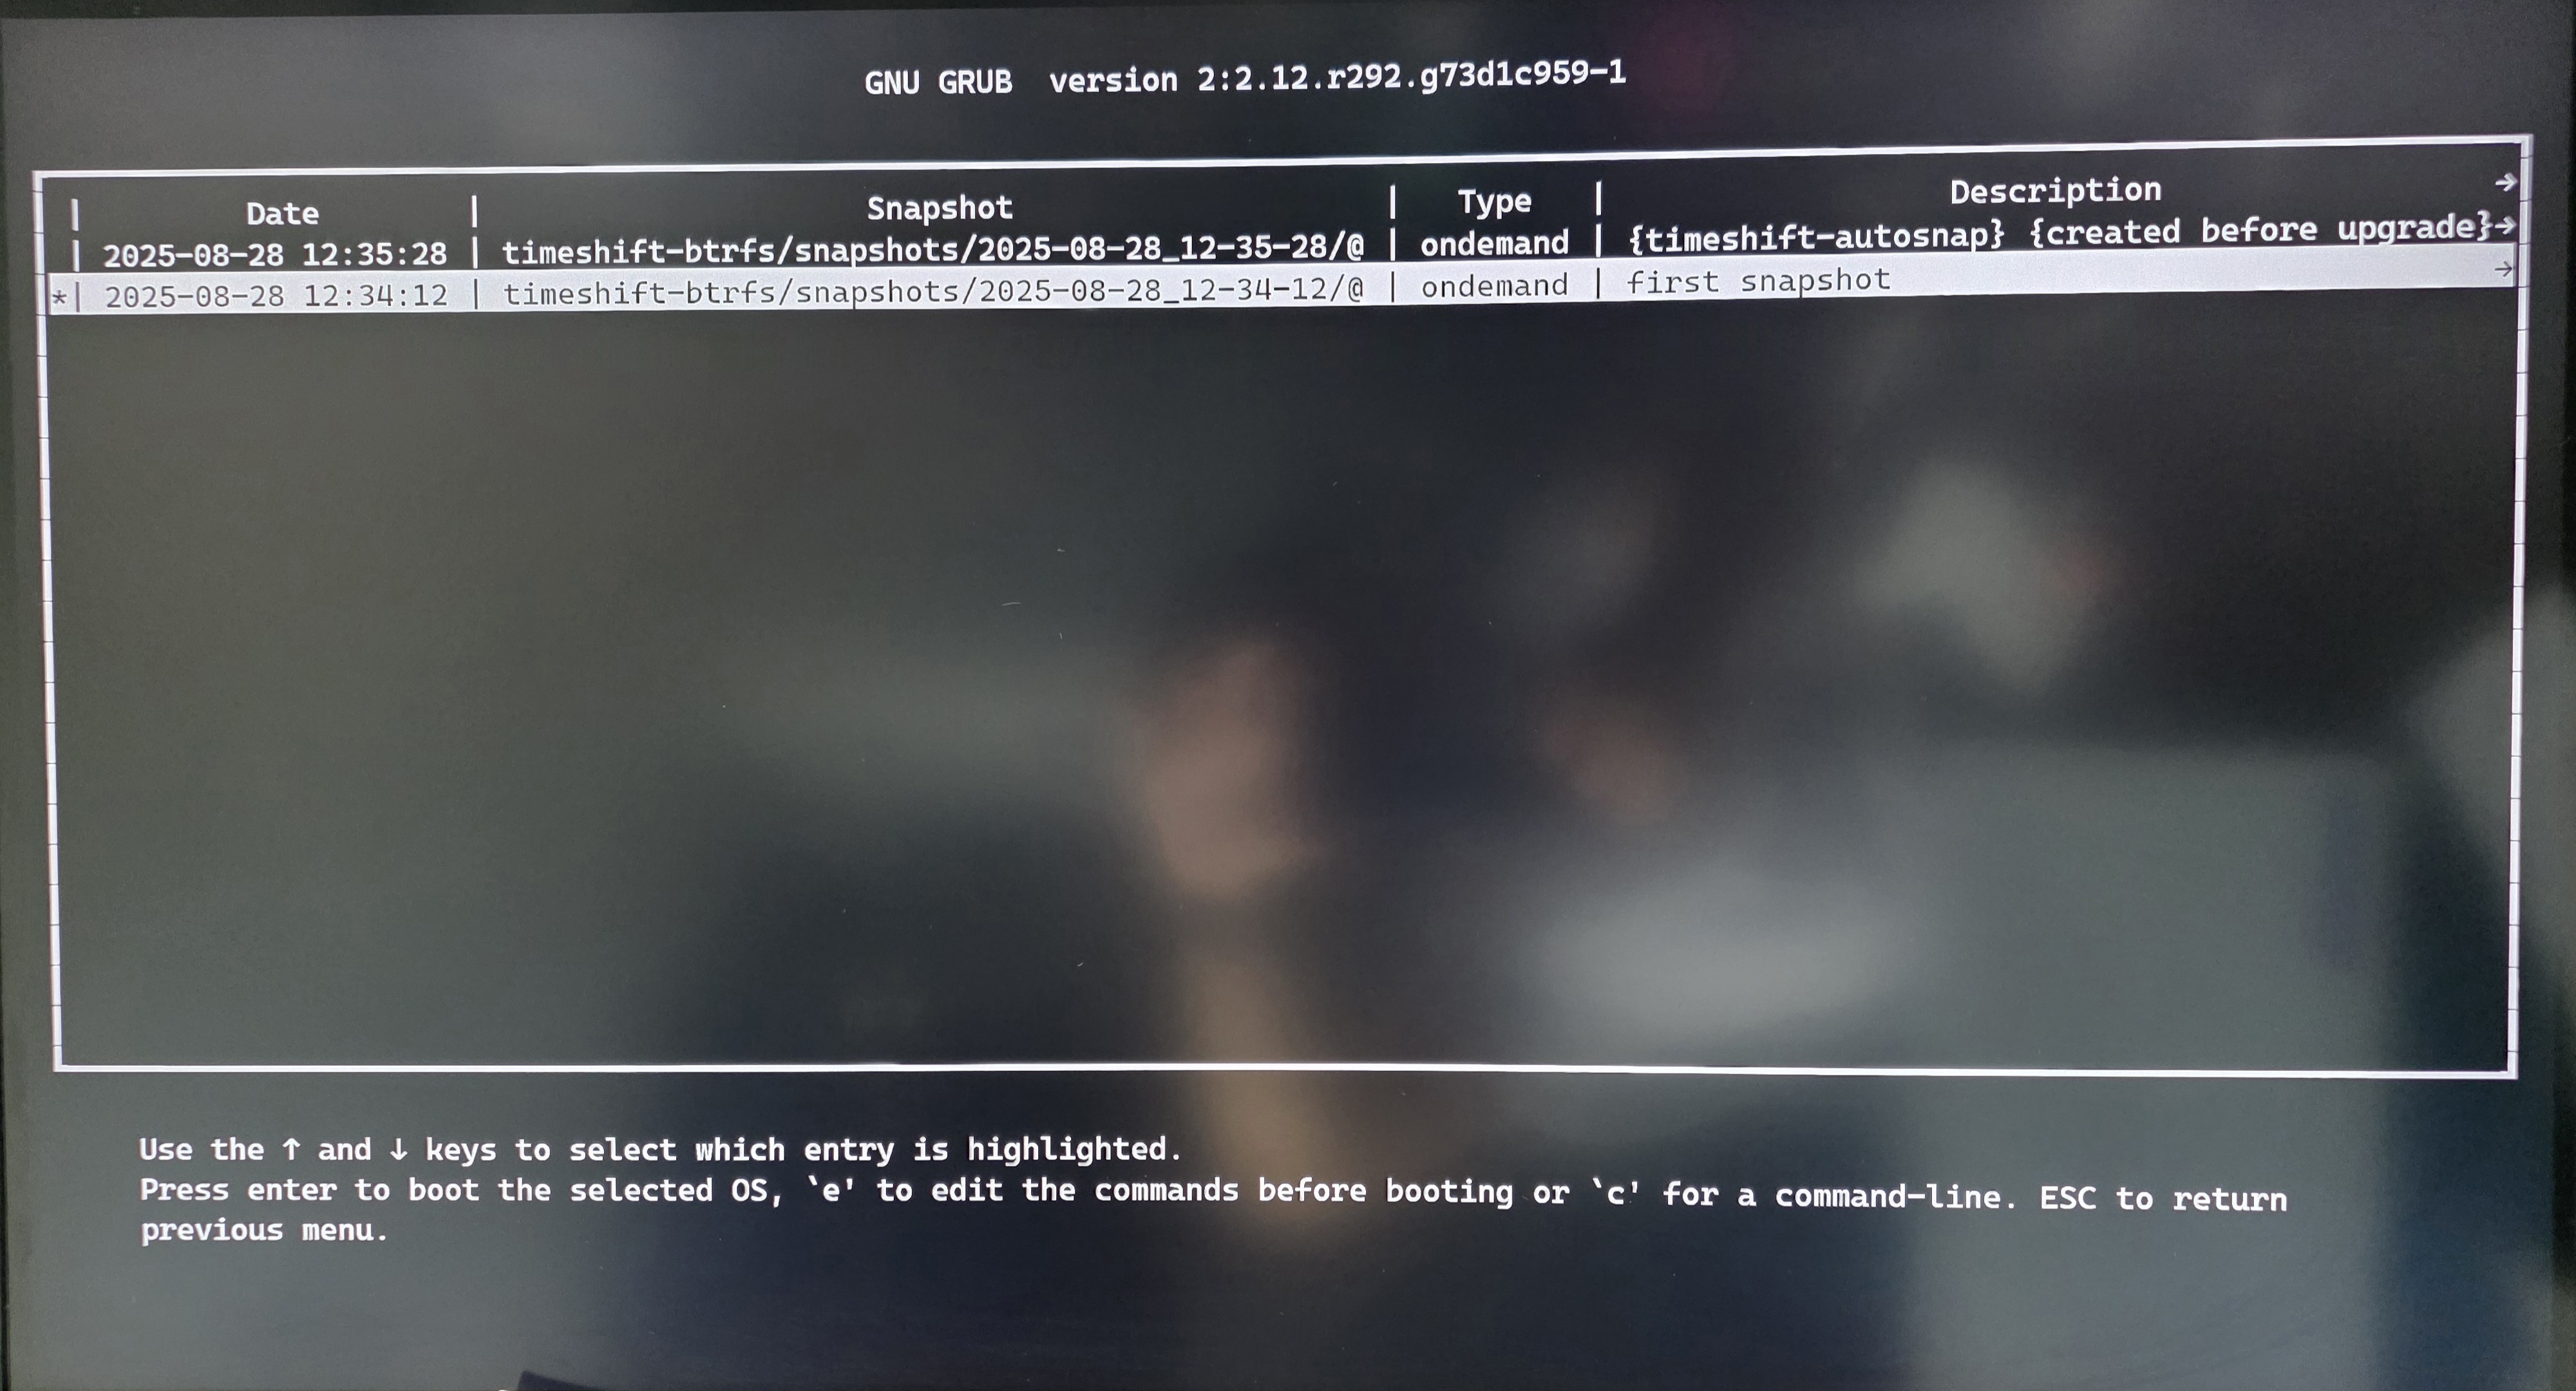
Now the entire reason for having chosen GRUB: allowing you to choose BTRFS snapshots to boot into the past, before some destructive operation, as shown in the photo above. For this we need the following:
pacman -S timeshift grub-btrfs
yay -S timeshift-autosnap
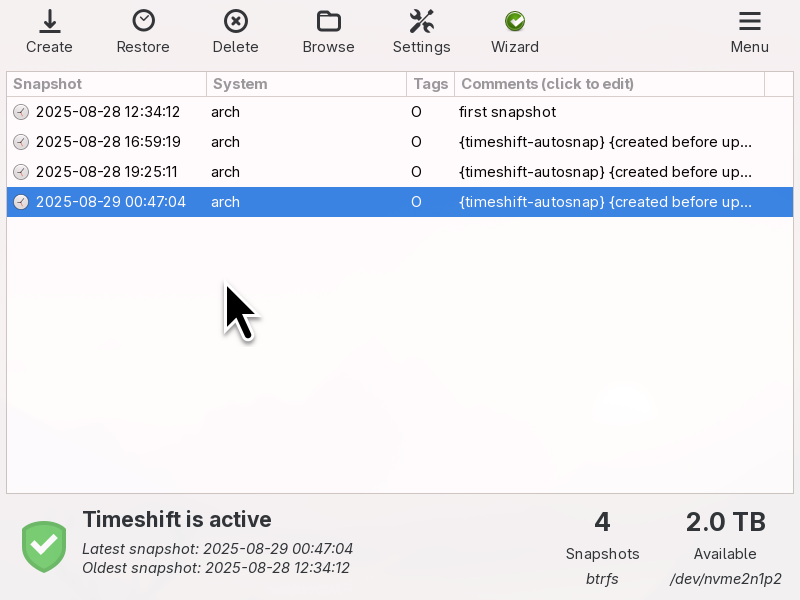
systemctl enable --now grub-btrfs.serviceDone. From now on, every time GRUB is rebuilt, it’ll have a new option to choose snapshots. We just need to create those snapshots automatically, and for that we have the Timeshift app. Open it and follow its step by step. The important thing is to choose the BTRFS option (yes, you can use RSYNC if you’re on ext4, but that occupies a lot of space, because it will literally keep making copies of your entire system’s files. The beauty of BTRFS is that its snapshots don’t duplicate files).
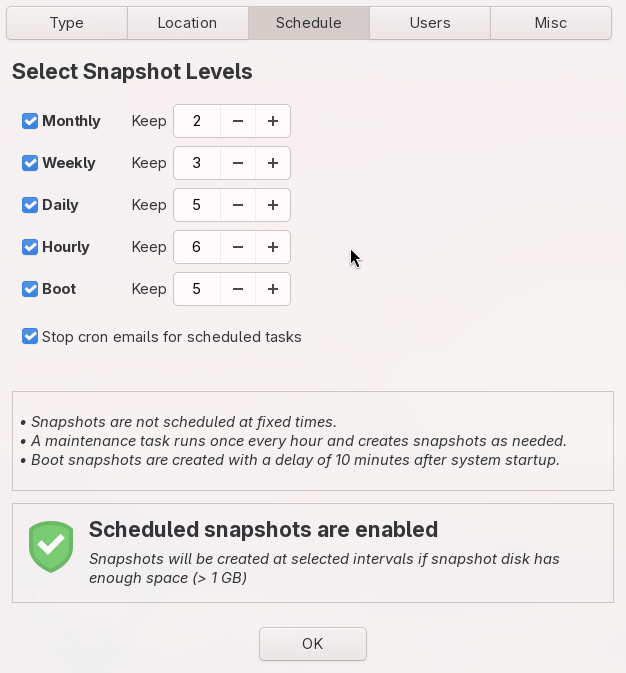
I leave it making snapshots and accumulating versions of the last hours, last days, last weeks, and months. If later on I remember “damn, there was that file I deleted last month but now I need it” just open Timeshift and browse a snapshot from last month. Like Mac folks do with Time Machine, but occupying almost no extra space.
Besides that, every package upgrade will generate a snapshot beforehand. That way, if by chance a corrupted package comes in or breaks some important config of yours, you can go back exactly to how it was before the update. And if it breaks catastrophically, where your Linux no longer boots, just go to the GRUB extra menu and boot from the previous snapshot, which worked. And everything comes back just like it was before.
Nothing is more important for your system than having automatic snapshots that occupy almost no extra space. This alone makes BTRFS superior to any alternative.
This does not replace external Backup!!
This rollback and the ability to recover things easily is good for day-to-day accidents. But let’s say your NVME breaks somehow, or your PC breaks somehow. That’s what external backups are for (be it external HD, NAS, or Cloud). You want to be sure that, in a catastrophic situation, it’s still possible to recover your files.
I have all the protection layers: local snapshots via BTRFS and Timeshift, backups done remotely to my NAS, and a backup of the most important parts of my NAS on Amazon Glacier which, unlike Amazon S3, is for keeping backups, where storage cost is ultra low but transfer cost is higher (S3 storage is more expensive but transfer is cheap, which is why it serves to serve website assets).
I like being prepared so that, in case my house catches fire, I don’t lose anything important.
9 - NFS on the NAS
Speaking of NAS, one thing I configured differently — since I primarily use Linux instead of Windows — was enabling the NFS server.
But beware that some NAS have a characteristic that can be annoying: your user on the NAS will have a UID and GID different from 1000!
When you create a user on any Linux, the default is to assign UID 1000 to the first user, 1001 to the second, and so on. But since on the Synology NAS the first user receives UID 1026, if I mount with NFS (which passes through UNIX permissions), I’ll have authorization problems.
There are two solutions: try to change the UID on the NAS from 1026 to 1000. I tried that and I’ll tell you up front it’s a waste of time, you can end up breaking your NAS’s configurations catastrophically.
It’s much easier to change the user of your new local Linux to be 1026 and that’s it. It’s pretty easy.
First, we need to log out and leave Hyprland and go back to the SDDM login screen. Then we need to switch to another TTY with CTRL + ALT + F3 (to go to tty3, for example). From there we have to log in as root.
Now we run: systemctl isolate multi-user.target to run in isolated recovery mode, where no other user has processes running. Since we’re going to mess with the user, they can’t be active.
usermod -u 1026 akitaonrails
groupmod -g 1026 akitaonrails
chown -R 1026:1026 /home/akitaonrails
With the commands above we change from 1000 to 1026 and fix the permissions on the local files to reflect this change. Now yes, we can edit /etc/fstab to mount the shared directories on the NAS with NFS:
# NFS
192.168.0.x:/volume1/GIGACHAD /mnt/gigachad nfs4 _netdev,noauto,nofail,bg,x-systemd.automount,x-systemd.requires=network-online.target,x-systemd.after=network-online.target,x-systemd.idle-timeout=60s,noatime,nodiratime,async,rsize=65536,wsize=65536,actimeo=1  0 0
192.168.0.x:/volume1/TERACHAD /mnt/terachad nfs4 _netdev,noauto,nofail,bg,x-systemd.automount,x-systemd.requires=network-online.target,x-systemd.after=network-online.target,x-systemd.idle-timeout=60s,noatime,nodiratime,async,rsize=65536,wsize=65536,actimeo=1  0 0
Don’t forget to create the mount points:
mkdir /mnt/gigachad
mkdir /mnt/terachad
Done, just reboot and everything will work correctly. The file permissions on the NAS — which are UID 1026 and GID 1026 — will be accessible to the local user without problems.
10 - Utilities
Here are the last small tips to keep everything in one place. The first is to replace the ls command with eza which offers a nicer face, with icons and everything, like this:

Just do yay -S eza and add this to your .zshrc or .bashrc:
alias ls='eza --icons --color=auto --group-directories-first'
alias ll='eza -l --icons --color=auto --group-directories-first'
alias la='eza -la --icons --color=auto --group-directories-first'
Second tip is to install Atuin. For anyone who deals with infra, this is extremely important: backup of all the command history you’ve used in your terminal to this day.
Install with yay -S atuin and do:
atuin login
atuin sync
Read the official site, but first you need to create an account and a secret encryption key — yes, you can run it locally on a server at your house, but their cloud option is pretty convenient and secure because it’s all encrypted, so there’s no problem if you upload passwords from your history.
Just put this in your .zshrc:
export ATUIN_NOBIND=true
eval "$(atuin init zsh)"
bindkey "^R" atuin-search

# incremental history search with arrow keys
bindkey "^[[A" history-beginning-search-backward
bindkey "^[[B" history-beginning-search-forward]]
If you’re using ZSH, its autocomplete will work normally but, if you type CTRL+R, it will open the Atuin history. It will save all your commands in a SQLite and sync. That way you can sync several machines and servers you use day-to-day or, as in my case, recover the whole history on a new install.
And to make it better, we can configure it to auto-sync:
mkdir -p ~/.config/atuin
sed -i 's/^#\?auto_sync.*/auto_sync = true/; s/^#\?sync_frequency.*/sync_frequency = "30m"/' ~/.config/atuin/config.toml 2>/dev/null || \
printf 'auto_sync = true\nsync_frequency = "30m"\n' >> ~/.config/atuin/config.toml
Third tip: since we have Docker already installed and configured, I like to use SGPT on the command line for when I want to remember the syntax of some command I rarely use, instead of opening an app or browser. Just add this to my .zshrc:
export OPENROUTER_API_KEY="sk-or-v1-8b8...17"
export OPENAI_API_KEY="sk-or-v1-db...f3"
export OPENAI_API_BASE="https://openrouter.ai/api/v1"

alias sgpt='docker run --rm -e OPENAI_API_BASE=${OPENAI_API_BASE} -e OPENAI_API_KEY=${OPENROUTER_API_KEY} ghcr.io/tbckr/sgpt:latest txt '
I use OpenRouter to have access to different commercial LLMs in a single API, but you can just use your OpenAI key. With this done, I’d use it in the terminal similar to this:
~ ❯ sgpt "what is the pacman command in Arch to find out if a particular file came from an installed package?"
To find out if a particular file came from an installed package in Arch Linux, you can use the following pacman command:

``bash
pacman -Qo /path/to/file
``

Replace "/path/to/file" with the actual path to the file you want to check. This command will show the package which owns the file, or report that the file does not belong to any package if that is the case.
If you want, it supports sessions, so it’ll remember the conversation on each new call. Read the project’s Github.
Since I backed up my old ~/.config, things like open tabs from my Brave browser opened normally in this new Omarchy install and I can keep doing my things exactly from the point I left off. I didn’t lose anything. The same goes for all the other apps like emails that I back up locally via Thunderbird. I don’t need to have it all downloaded again.
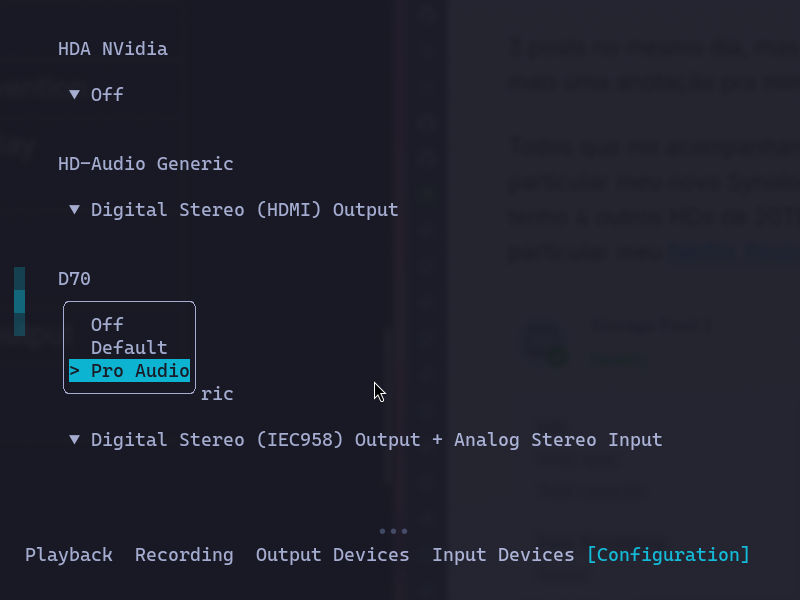
If, like me, you have several audio output devices, it’s possible that right after finishing the install you’ll notice that it seems there’s no sound. But that’s not a problem because it may just be that the output is pointing to the wrong device or the wrong profile. Use SUPER ALT SPACE to open the Omarchy menu, choose SETUP and AUDIO to open that program which is text mode (I like text mode programs).
In my case, I use a Topping D70 DAC to process my audio and the “Default” profile doesn’t work but switching to “Pro Audio” worked. Also be careful that there’s a global volume setting and individual volume control per program. Overall, thanks to Pipewire, everything should work normally.
I tested apps like Discord, Blender, Bambu Studio, VLC and everything worked perfectly. Only VLC needed codecs from a separate package:
yay -S extra/vlc-plugin-ffmpegBlender too, the best is to install from this package:
yay -S blender-binIf you use the normal “blender” package, some of its add-ons don’t install right. I had this problem with MACHIN3Tools and MESHMachine, for example.
Speaking of Blender, it’s an X11 app. Wayland runs X11 applications using an adapter layer called XWayland. I had several problems with menu and dialog box positioning, even adding windowrule. One thing that worked, I’m not sure why, was installing Blender and Bambu Studio via Flatpak:
yay -S flatpak
flatpak install org.blender.Blender
flatpak install com.bambulab.BambuStudio
Finally, if you’re new to LazyVim, don’t forget to run the :LazyExtras command to install extra plugins for your favorite languages, like LSP, Linter, syntax highlight, snippets, and more. Pure LazyVim is already complete but without support for many languages so as not to be unnecessarily heavy; you need to install them separately afterwards.
Also learn to use Mise-en-place. In the Omarchy menu there’s an option to install support for various languages and it will use Mise, which is the correct way to manage your languages.
Mise is really easy, in general, from inside your project directory, just do something like:
mise use ruby@3.4.3With this, only inside your project will Ruby 3.4.3 be available, but outside there can be another global version. Don’t forget to activate it in your .zshrc:
eval "$(mise activate zsh)"Impressions and Conclusion
Compared to my old Manjaro, there’s a lot I no longer need to configure. For example, because of the amount of space Docker and LLMs needed, I had configured an iSCSI drive on my NAS just for that. But since I freed up 2 TB of local NVME, I no longer need to deal with that, I just use the new BTRFS sub-volumes I created above.
I also no longer need to configure QEMU/Libvirt because I no longer need to use Windows alongside Linux side by side. I kept the NVME with the Windows partitions and I can dual boot to it if I really need something. Overall I never need it, so it’s one less complicated configuration.
I spent months using apps via Flatpak, with the aim of being more secure and isolated from the system. It’s like running apps via Docker. But it’s too annoying. Being isolated means it doesn’t obey system themes, and in the end I’m forced to keep opening permissions for the apps. And if it’s going to keep opening them, it’s easier to install natively via yay and everything works perfectly.
I think that completes my notes of everything I needed to do to leave Omarchy exactly the way I like. As I said repeatedly, what works for me doesn’t mean it’ll work for you. For that there’s documentation like ArchWiki which is “THE” best place to learn everything about Linux. Use and abuse that documentation.
As you can see, there wasn’t all that much I customized in Omarchy, which is why I like it: it already did 95% of the path for me, I just had to touch a few adjustments to leave it the way I need. And now without all the junk that piled up in my old Manjaro. I recommend everyone install Omarchy as a first Linux and learn to actually use it.